Tuesday, March 31, 2009

A Pretty Card and Altered Journal... and final farewell to SAB!

Today is the last day of Stampin' Up!'s biggest promotion of the year: Sale-A-Bration! Here's one last card I made using a stamp set I received FREE: Polka Dot Punches.
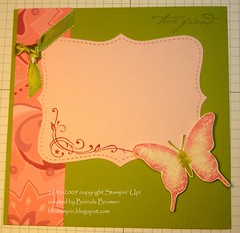
I made this card for my niece, Carrie's birthday. The flower is from the Pretties kit and was colored using Baja Breeze ink and a dauber.
It doesn't coordinate at all with the card, but I also made Carrie an altered journal:
As you can see, I used another flower on the cover--I left this one white. You may recognize the patterned paper from another project I recently posted. It's from a retired scrappin' kit and I thought the sage shadow and brown combination would be perfect for my niece.
Here's the inside cover:
I used a Top Note die to frame a gift card on the inside front cover. Several layers of scallop circles from the Birds & Blooms Sizzlit dies are attached (with a jumbo brad and adhesive) to the bottom of the ribbon bookmark.
Happy Stampin!

Saturday, March 28, 2009

Sale-A-Bration Countdown... and cute baby card & knit hat!

Don't miss out on earning FREE STUFF with the Sale-A-Bration promotion. This awesome sale only happens once a year and it ends in just a few days--Tuesday, March 31!

Here is a card I made using the Delicate Dots Designer Paper and Ribbon Bundle, which are both products you can only get for FREE during Sale-A-Bration:

You may have guessed, I knit the sweet little hat too. This was a gift for my friends' new baby, Haden. He is such a cutie!

If you'd like to place an order or you have any questions, please feel free to call or email me. My contact info is on my Stampin' Up! website. Of course, you can also place your order online through my website.

Happy Stampin!

Wednesday, March 25, 2009

Easter Sampler Projects

Here are the projects we did at my Easter Sampler class last night:
I have to admit, none of these projects were my original idea. In my exhaustive search for the perfect projects, while spending quality time with one of my best friends (the computer), I found them. As most creative demos do, I then in turn, made them "my own" and shared them with my customers.
The basic idea of the paper-pieced sheep came from a fellow demo on SCS. Unfortunately, I don't recall her name. I can't wait to share this cute little guy... or girl with my knitting friends! Making the carrot out of the pennant die was something Lyssa posted on her blog earlier this month--what a clever and oh so easy idea!

Here's a closer look:
Occasions Mini Sneak Peek Stamp Set: Forest Friends
Other Supplies: Frames with a Flourish, All Holidays, Eyelet Border punch, Brads, SAB Ribbon Bundle & DSP, Dimensionals and Stamp-A-Ma-Jig (a real crowd pleaser!)

Supplies: Scallop Circle Die, Big Shot, Wide Oval Punch, Heart to Heart Punch, Rhinestone Brad, Gingham Ribbon, and SAB Ribbon Bundle.
-
Supplies: Pennant Die, Big Shot, Sanded BG, Sponge, Grosgrain Ribbon, Eyelets and Crop-A-Dile.
-
If you'd like to come to one of my classes, check out the calendar of events on my Stampin' Up! website and give me a call! Do you have a special class request, let me know!
******
Don't forget, Sale-A-Bration will be ending in less than a week! Be sure to take advantage of this awesome promotion before it's too late! Either place your order online through my website or give me a call and you'll be...
-
Happy Stampin!

Friday, March 20, 2009

Big Shot: Not Just for Papercrafts...

Check out this yard flag I made using the Big Shot Serif Essentials Alphabet Dies:

I planned to use fusible webbing to attach the letters before I stitched them in place. But when I removed the backing, the letters became very curled up and almost impossible to iron on the nylon flag material. So, I used the fusible webbing as a stabilizer (without removing the backing) and just pinned and held the letters in place as I stitched around them. The flag fabric was really slippery, so I had to improvise when a letter slipped out of place and use the zigzag stitch to recreate that portion of the letter. I don't believe this would be a problem with a more stable fabric--like cotton.

I'd like to note that I tried cutting a letter out of a Decor Elements sheet and attaching it to the flag, but the letter just peeled off. Decor Elements is meant to use on a sturdier surface, like a wall, piece of wood or glass. The reason I even thought to try it on the flag was because I have applied Decor Elements on various canvas surfaces and it has worked well. Obviously, canvas is a much sturdier fabric. I shared one of those projects with you in the past, you may recall The Monogrammed Journal. The other time was with the Create definition applied to a stretched canvas. I will post that project soon.

The gorgeous embroidery and finishing of the flag was done by my crafty friend, Genean. We made this flag to replace a well-worn plastic covered cardboard sign that our Stitch & Gab group currently uses in the front yard of the person who hosts the meeting. We will be presenting the group with this flag at the next meeting.

I plan to make another flag that will say "Stampers Welcome" to display in my front yard when I hold classes! Perhaps I should also make one that says:
Happy Stampin! :)

Sunday, March 15, 2009

Altered Bitty Book Gift

I have been hoarding this chipboard bitty book kit for quite some time now... well before it was put on the retiring accessories list. When my crafty friend's crafty daughter invited me to her tween birthday party, I thought it would be the perfect time to break it out from hoarding hiding and decorate it for someone who will truly appreciate it!

You may have guessed... her name is Kerri. Well, Kerri's favorite color combination is blue and brown, so when I dug through some of my other hoarded stash (of retired scrappin' kits) and found this paper, I knew it would be perfect for Kerri's gift. The K is cut out of a Sticky Sheet, using a Serif Essentials Alphabet die and the Big Shot. I combined some green and blue cosmo fine glitter to create the perfect shade of "greeny blue" to coordinate with the paper, which I believe is Sage Shadow. I left the inside pages (alternating sage shadow & chocolate chip card stock) blank and gave her some stickers from the kit and some coordinating gel pens to decorate them as she'd like.
*
An early sign that I had picked the perfect color combination was the fact that Kerri was wearing these exact colors at the party! By the way, it was so fun seeing the reaction from Kerri and all the other girls (including my crafty friend, Genean) when she opened it... sort of a GASP! and jaws dropping. You could say I was doing a happy dance inside. :) Living so far from family (who I normally craft gifts for) I don't usually get to see the reaction when my handcrafted gifts are opened. Definitely makes it worth the time and effort that goes into making them.
*
I have to say, since I only have boys (12 & almost 15 years old), it was quite an experience going to a crafty "girl" party. Their final activity of the night was altering Stampin' Up!'s skinny clipboards and they had a blast! They couldn't wait to bring them to school to display in their lockers. As I was helping them with their craft, one of the girls even said "Hey, Ms. Brenda, I need to have you come to my party!"
*
I am Happy Stampin! Hope you are too!

Saturday, March 14, 2009

The Butterfly Experiment

Here are some of the results of my butterfly experiment:

Click on the picture to read the tiny print and see how these butterflies were made.


A Work of Butterfly Art!

Have I mentioned that True Friends is one of my favorite stamp sets? Well, here's another project I made using it. This 6 x 6 scrapbook page is a project we did at a workshop the other day. Aside from True Friends, we also used a stamp from Yummy (a Sale-A-Bration set) on the bottom edge of the Top Note. If you don't know, this stamp also has "a little something for you" above the swirls. We used a Rose Red marker to ink just the swirls to create a border for a picture that will be added later.

The process of coming up with the perfect butterfly was like a mini science experiment. At first I tried the rock-n-rock technique on regular Whisper White card stock--which was nice enough, but lacked a little something (no pun intended). I also tried coloring the entire stamp with markers, stamping on various types of card stock, spraying the stamp after doing the rock-n-roll technique, etc.

And after many other variation, I ultimately inked the butterfly in Pink Pirouette ink, used a sponge dauber with Rose Red ink around the edges to add dimension to the wings, colored the body using an Old Olive marker and, finally, I spritzed the stamp with a little water and stamped it onto WATERCOLOR PAPER. I have to tell you, the watercolor paper made all the difference in the world! When I stamped the water spritzed image onto regular card stock, the colors blended into a mucky mess. But on the watercolor paper, it's like a work of art!

Go ahead, give it a try! ...and you'll be Happy Stampin!

Friday, March 6, 2009

Getting Creative with Envelopes!

By special request from a customer, I held an envelope technique class--where we got creative with envelopes. First off, we went over the basic construction of an envelope while taking a large envelope apart and using it as a template to make an envelope out of good quality wrapping paper (we used some of the wrapping paper that Stampin' Up! carried in a Holiday Mini awhile back). Sorry, I didn't take a picture of that envelope.

Then we made this:

The box is made out of 2 card stock envelopes (cut out using the Scallop Envelope Bigz Die with the Big Shot) and 2 small pieces of card stock for the sides (1-1/2" x 2"). I found the simple box idea on Laura's blog. You may have noticed the crochet flower (Fleurette) and clear rhinestone brad... don't they coordinate perfectly with the papers?! These are new in the Spring-Summer Idea Book & Catalog!

Of course, we couldn't make a box and not have something to put inside. So we also made a 3" x 3" card with matching envelope. The envelope is made with the same principle as the large envelope, by taking apart a small square envelope and using it as a template to make an envelope--this time it was out of designer series paper (Bella Rose).

Stamp: A Little Somethin' (level 2 hostess set)

Tips:
  • Create heavy duty envelope templates using cardboard from various packaging.
  • The large envelope is quite long, so either tape two pieces of cardboard together or use a flatten cereal box when making a template.
  • When assembling an envelope, don't use too much adhesive on the flaps--you don't want to glue the inside of the envelope together or have your card get stuck inside.
  • Consider using other non-conventional materials to make envelopes: wallpaper, crumpled up tissue paper or napkins ironed onto freezer paper, vellum, acetate, newspaper, old calendars, magazines...
  • Check with your post office to see if your handmade envelopes (if they're made out of anything but paper) will cost extra to mail.

Happy Stampin!

Wednesday, March 4, 2009

Construction Survival Kit

My husband's office is under construction. Last weekend, he came to me with the idea of making "survival kits" for the people who work in his office and asked for my creative/crafty help. So off we went to the store to purchase all the multi/mini packs of candy, liquor and Motrin they had. Don't ask where the earplugs came from... with my hubby being a pilot in the Air Force, we have acquired a huge stash of them over the years.

After we got home, I went to work on the super simple labels--being from my hubby, they couldn't be floral, frilly or girly in anyway. I ended up using the computer since I didn't have appropriate stamps for the "occasion". Then I dug through my stash of card stock for just the right colors to coordinate with the font & clip art colors and used large cellophane bags & circle punches from my Stampin' Up! supplies.

If you wanted, you could make something similar for your child's teacher--a teacher's survival kit (perhaps substituting a packet of tea or coffee for the Jack Daniels... or not). :-) Then you could also use all the flowery, frilly, girly stamps and accessories that you wanted--unless it was a guy teacher!

By the way, the candy baby bottle was just for the pregnant woman in his office... although, he did still included the bottle of JD in her kit--in case she wanted to give it to her husband. How thoughtful of my hubby, huh?!

Happy Paper Craftin!

Sunday, March 1, 2009

Occasions Mini Sneak Peek

With Easter just around the corner (April 12), but the Occasions Mini not going live until April 1, Stampin' Up! is letting customers place orders for the Easter themed sets in the mini brochure starting TODAY! That way you can get a head start on your Easter cards and gift projects ASAP! Here's one of the projects pictured in the mini:


Click HERE for the 3 pages from the mini you can order from NOW! When you've decided which stamps you'd like to order, give me a call or SHOP NOW on my website! If you've placed an order with me recently, you should be receiving your very own hard copy of the brochure by April 1.
Happy Stampin!
Brenda