
FYI: The All in the Family and Mission Embossable Bundles are SOLD OUT! If there is a bundle on your wish list, don't wait much longer to place your order! Contact me or go to my website to place your order online today!
Happy Stampin!
Friday, November 28, 2008
Wednesday, November 26, 2008
Glittery Letter Card
Since one of the bundles on sale right now has the sticky cut letters and fine cosmo glitter (Sticky Situation Bundle, item 116222), I thought I'd share a card I made awhile back using them:

The gift stamp is part of a retired set, but we have other birthday stamp sets that would work for a card like this. By the way, this is not the usual card size of half a 8 1/2 x 11 piece of card stock. It is actually 1/4 of a 12x12 piece of card stock--6x6, folded in half to make a 3x6 card. This size card fits in our Small Open-End Envelopes.
If you're interested in ordering the Sticky Situation Bundle or any of the other bundles that are part of the Holiday Extravaganza Sale, go to my website now and shop online!
Happy Stampin!
IT'S HERE! The Sale Starts TODAY!
Check it out!


Go to my Stampin' Up! Website now to place your order! This sale is good through December 1, but supplies are limited!
Happy Stampin!
Monday, November 24, 2008
Holiday Extravaganza Sale Coming Soon! (Nov 26-Dec 1)

Don't forget, online shopping is now available 24/7!
If you'd rather contact me directly to place your order, that's fine too. Just be sure you call me ASAP (my contact info is on my website), as these bundled savings are only while supplies last!
Happy Stampin!
Friday, November 21, 2008
Reverse Masking, with a twist!
Are you looking for simple, single layer card ideas that are also eye catching? Using the reverse masking technique, you can do just that! With the very versatile stamp set Best Wishes & More (page 55, IB&C), I have created 2 cards using that technique, one with a twist. Here's the first one:

Here's how you do it:

Here's how you do it:
- Use post-it notes or paper with removable adhesive* to cover (mask) 3/4 - 1" in from each side of a white or neutral card front. Grid paper under your card helps you position the masking just right. You can also use a light pencil mark that can be erased later.
- To create depth, use 2 ink pads that are different shades of the same color. (In the top card I used Kiwi Kiss & Old Olive. In the card below, I used Baja Breeze & Not Quite Navy.) Starting with the lighter color, sponge the entire inside exposed area. Then sponge the darker color around the edges of the masking and lightly in random areas in the middle.
- While the edges are still masked, ink your stamp with the lighter color and stamp randomly. Then do the same thing with the darker color.
- Now remove the masking and add a couple more stamped images in the white space as though they are falling onto and off of your card.
- Stamp desired sentiment in the lower right corner.
VOILA! you've made a card out of one piece of card stock! You could add ribbon or other embellishments, but I don't think they need it.
Now for the twist, in the below card I added an extra technique--emboss resist. After I masked the edges, but before I sponged, I used the Versamark pad and clear embossing powder to heat emboss a couple of the snowflakes. The one challenge I found with this step is that the embossing powder wanted to stick to the masking layer. I used a brush to wipe away that extra powder prior to heat setting. Then just continue on with the above steps and you not only have snowflakes in 2 shades of blue, you also have some white ones that POP off the card!
*Since making these cards using post-it notes, I have been thinking about how the masking process could be done more simply (just in case this happens to be your Christmas card and you have to make a bunch of them). I had the idea to cut a piece of printer paper to the size of the card front, use a sliding blade type paper trimmer to cut the inner space out and attach that with removable adhesive. After a few uses, the ink would start to bleed through the paper (just as it would with post-it notes), so you may have to make several of these, but it would definitely make the masking step easier.
I have been working on making our family Christmas cards and have already completed 40 cards. Yesterday I finally went through our friends & family list and counted just how many cards we'll need... and was shocked to discover we'll need OVER 100!!! Up until now, I have been making the multi-layered cards that I designed for last weekend's Christmas card class (which went great, by the way)... I think I may have to switch to the simple single layer card! That is one of the reasons I was motivated to come up with a simpler way of masking. :)
How are your Christmas cards coming along? Have you even started them yet? I hope this inspires you to get working on them. There's just 34 days until Christmas!
Happy Stampin!
Tuesday, November 18, 2008
Decor Elements Monogrammed Journal
I'd like to share a journal I decorated with a monogram from Stampin' Up!'s Decor Elements line:

This is a super quick project. I found the plain black journal on the clearance rack at Borders Book Store. After applying the monogram , I figured it needed a little something else, so I pulled out some satin ribbon and my much hoarded Pretties Kit and add just the right touch to make the cover... well, Pretty! Here's a close-up:

This may not be the most practical embellishment for a book that will be stored on a bookshelf, but I think it would be oh so inspiring to write in at bed time if it were laying on my bedside table. By the way, each letter comes in a pack with an upper and lower case letter, so I have an upper case B leftover to use on another project.
Happy Stampin!
Friday, November 14, 2008
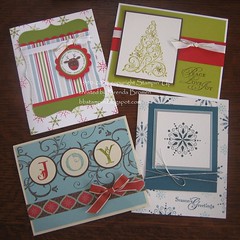
Christmas Card Class Projects
Here are the cards we'll be making tomorrow (Sat) at my Christmas Card class. We'll be making 3 of each--12 cards total (yup, I'm good at math). ;) It's too late to sign up for tomorrow's class, but if you like the cards you see and would like me to schedule another class, please let me know. There's still time!
Also, if you happen to be a friend or family, you will probably be seeing one of these cards up close and personal in less than a month, as these will also be my family's cards this year.
Happy Stampin!
Also, if you happen to be a friend or family, you will probably be seeing one of these cards up close and personal in less than a month, as these will also be my family's cards this year.
Happy Stampin!
Wednesday, November 12, 2008
Inspiration Journal
I have another project to share with you that was inspired by the Stampin' Up! Regional seminar I went to last month: 


A well-known, awesomely creative man in the Stampin' Up! circle, Jaron, shared this idea with us. You start with a coordinating piece of card stock for the base and punch a bunch of various sized circles out of a pack of Designer Series Papers (I used Urban Garden).
Starting in the center, you put a whole circle. From there, you use the circle punches to take bites out of the other circles so they will fit (like a puzzle) around the other pieces. It doesn't have to be exact, but I did find it a bit putsy. Before I glued anything down, I first placed all of the circles. Thank goodness the ceiling fan wasn't on full blast! ;-)
In order to get the circles all the way to the spiral edge, I carefully removed the spiral binding prior to attaching the card stock base. The spiral punch made the binding holes. If you try this, make sure you remember how it goes back on... the first time I put it back together, I put the spiral on upside down.
Jaron uses his book for his inspirational journal. He cuts out pictures from magazines and takes pictures of whatever inspires him, then attaches them to the pages of his journal. He includes notes of whatever colors, accessories, stamps, etc. that he's inspired to use (all Stampin' Up! products, of course). I LOVE THIS IDEA! I'm already inspired wherever I go. I usually use post-it notes or whatever scraps of paper are nearby to sketch my ideas or write my notes on... I love the idea of having one place to keep them all!
I want to remind of you one of the projects I posted back in August where I showed you my inspiration and the card I made from it:
Aren't the colors a perfect match?!
Now... go find some creative inspiration and get Happy Stampin!
Tuesday, November 11, 2008
Happy Veteran's Day
In honor of Veteran's Day, I want to share my favorite patriotic card: 

I used The Free & the Brave and Starstruck stamp sets. The Free & the Brave (item #110982, $19.95) is not in the current catalog, but is on the dormant list--which means you can still order it. I love that set!
.
An embellishment that I used on this card that I always forget about is the Build-A-Brad (the star on the lower left corner). These are so neat because you can add whatever image you want to your cards in a 3-D embellishment using these brads. It comes with the base of the brad, where you attach your image punched out with the 1/2" circle punch (using your desired adhesive--I used Crystal Effects), then you add the clear shiny sticker over the top and attach it to your project as you would a regular brad. Click on the picture for a closer look.
.
If you have any questions about the other products or techniques used on this card, feel free to ask.
.
Happy Stampin!
Monday, November 10, 2008
Rub-Ons On Sale: November 10-30!
In celebration of Stampin’ Up!’s twentieth anniversary, spend $20 in Stampin’ Up! merchandise, and get 20 percent off all Rub-Ons in the Fall-Winter 2008 Idea Book & Catalog (pages 178-179) and Holiday 2008 Mini Catalog (pages 11 & 17)--reg. price $10.95, sale price $8.76!
There are many number of ways to use rub-ons! Here are some ideas:
There are many number of ways to use rub-ons! Here are some ideas:
- Ceramic canisters
- Photo frames
- Appliances
- Candles
- Album covers
- Book covers
- Photo boxes
- Keepsakes
- Invitations
- Notecards
- Envelopes
- Photos
- Cards
- Glass doors
- Windows
- Mirrors
- Tile
- Computers
- Pencil pouches
- Lunch sacks
- Magnets
And many, many more!
Contact me to place your order... or shop online 24/7 at my website. But don’t wait—this offer is only available November 10-November 30!
Happy Stampin!
Friday, November 7, 2008
Pretty in Pink!
Has it really been almost a week since my last post?! Time flies when you're having fun... being creative! I want to share one of the cards I made using a WOW technique I saw at the San Antonio Regional seminar:

Here's a close-up:

As you can see, there are many glittery layers. I will give you the basic directions for creating the flower.

Here's a close-up:

As you can see, there are many glittery layers. I will give you the basic directions for creating the flower.
- Make each petal by punching small oval out of card stock and then punch large oval directly over the hole created (you'll need 10 petals (pink pirouette) and 2 leaves (certainly celery). I punched them off centered so one edge is a little wider than the other.
- Arrange 5 petals on paper vellum in a circle (overlapping middle edges) and adhere (make 2) and then arrange 2 green ovals (overlapping ends) on vellum for leaves and adhere. I used Mono Multi Adhesive very sparingly.
- Carefully put liquid adhesive (Mono Multi or Crystal Effects) on flower parts and sprinkle with Dazzling Diamonds Glitter. Tap off excess and let dry.
- Cut around the outside of each of the 3 shapes.
- Layer the 2 pink flowers as pictured onto card front (use small bit of glue in center between layers to hold in place), poke small hole in center (I used paper piercing tool) and attach Filigree Brad.
- Add a bit of glue on end of leaves and tuck under flower as pictured.
- Complete card as desired.
Happy Stampin!
Saturday, November 1, 2008
November Class Schedule
Gearing up for the Holiday season, I have scheduled some special gift and Christmas card classes. Check the schedule and if you don't see a class offered that you'd like, let me know. Personal classes are also welcome--get a few of your friends together for some stampin' fun!

CHRISTMAS CARD CLASS
Saturday, November 15, 1-4pm
Come to this class and make 12 Christmas cards.
FREE EVENT: To Get You Stampin'
Thursday, November 6, 1-3pm
Do you have stamp sets laying around yet to be assembled? Are you stumped for ideas for what to do with your new stampin' supplies? Come over to my house for some guidance and creative inspiration. Bring your stamps, consumable supplies and get stampin'!
Thursday, November 6, 1-3pm
Do you have stamp sets laying around yet to be assembled? Are you stumped for ideas for what to do with your new stampin' supplies? Come over to my house for some guidance and creative inspiration. Bring your stamps, consumable supplies and get stampin'!
Please RSVP by Nov. 5 for this FREE event!
HOLIDAY GIFT CLASS: Tumble Tile Coasters
Thursday, November 13, 10-noon or 7-9pm
Create a set of 4 beautifully hand-stamped tumbled tile coasters--perfect for any gift-giving occasion.
Class fee: $15 (first set of 4 tiles), $10 for each additional set of 4 (Let me know how many you'd like to make when RSVPing)
Please RSVP by Nov 10 **Choose morning or evening class time**
Project Sample of Coasters (many more stamp sets to choose from):
CHRISTMAS CARD CLASS
Saturday, November 15, 1-4pm
Come to this class and make 12 Christmas cards.
Class fee: $20 (includes envelopes)
SUPPLIES YOU NEED TO BRING: scissors & adhesive
RSVP by Nov 10.
**Bring a friend or place an order at this event and get a $5 discount off class fee!**
Don't wait--space is limited! Contact me today to RSVP for any of these events or to schedule your personal event! You are always encouraged to bring a friend to any of my scheduled events. I truly appreciate you helping me grow my business.
Subscribe to:
Posts (Atom)


