Thursday, February 26, 2009

Blast Off with Punches!

Here's a quick and easy card using several punches: 1 3/8" square, word window and both star punches. It's a fun way to use up scraps of card stock you may have left over from other projects.

Stamp Sets: Pun Fun & Family Phrases

The rocket is watercolored using an aqua painter and ink pads. This is another project that I used only In-Colors on: Riding Hood Red, Baja Breeze, Pacific Point Tangerine Tango & Kiwi Kiss.
Happy Stampin!

Saturday, February 21, 2009

Seeing Spots with Delicate Dots

Even though the Seeing Spots stamp set has been around for a while, it still has a fun & fresh look. AND it coordinates with the Sale-A-Bration Delicate Dots Designer Series Paper--which you can earn free now until March 31! For more info, click on the SAB brochure--->

Using a similar layout as the Howdy card I shared with you back in January, along with Seeing Spots, Delicate Dots DSP (SAB), Ribbon Bundle (also earned free with SAB), and several other products, I created these cards that were featured at my Just Cards Class yesterday:

Other Supplies: Flower Brad (item# 112583), Big Shot w/flowery swirl Backgrounds I Texturz Plate, 1", 1-1/4" & 1/16" circle punches, All Holidays

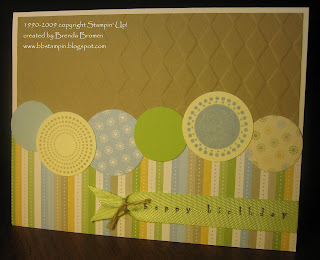
Other Supplies: Linen Thread (Item# 104199), Big Shot w/diamond pattern Backgrounds I Texturz Plate, 1" & 1 1/4" circle punches, All Holidays

Unintentionally, all of the projects I had at the class yesterday used the new Stampin' Up! exclusive Backgrounds I Texturz Plates (item# 114512) with the Big Shot (item# 113439). I guess this is another one of my new favorite things in the Spring-Summer IB&C. It's not just me though, everyone at the class LOVED the look the various textures added to all of the cards.
*****
UPCOMING CLASSES: Be sure to check out my events calendar on my website. Coming up in March, I have schedule a Technique Class where we'll be getting creative with envelopes and an Easter Sampler Class where we'll be making 3 Easter/Spring themed projects (daytime & evening class times available).
Happy Stampin!

Wednesday, February 18, 2009

Quilt Quips Quard

One of the other crafty hobbies that I enjoy is quilting. Since becoming a demo almost 2 years ago, I haven't done a whole lot of quilting... in fact, thinking back, my last quilt project was probably completed around the time I became a demo! Maybe this card could be considered "quilting"... since it uses the adorable new Quilt Quips stamp set.

I love all of the clever saying that come with this set. Check out the entire 8-piece set (click on it to get a closer look):
To cut the blocks out, I used the 1-1/4" square punch. It leaves a nice border, so when you watercolor the blocks, they pop off the card! For this card, I used 5 of the 6 in-colors: Tangerine Tango, Baja Breeze, Kiwi Kiss, Pacific Point and Riding Hood Red along with Naturals White and Basic Black. The watercoloring was done with blender pens and ink pads.
I'm hoping this stamp set will motivate me to pull out my fabrics again and get stitching.
Happy Stampin!

Monday, February 16, 2009

There's nothing like a box of chocolates...

I found the cutest little box idea on splitcoaststampers.com. They call it Ghirardelli® Box, but I ended up putting miniature Hershey bars in it sideways. Either way, you will have to use your imagination to picture the chocolates in the box. I took several pictures before I filled the box with chocolates and then gave it away to my special crafty friend, Genean before I took another picture of it. Here it is:
And again open:

Don't those chocolates look irresistible?! ;)
And a close-up side view:
Check out the secret of how the box stays closed--the circle is attached with 2 dimensionals towards the bottom, leaving a gap at the top for the flap to tuck into. Click HERE for the SCS tutorial.
Happy Stampin!

Friday, February 13, 2009

Getting "Rustic" with Rustic Rooster

If you like the rustic, distressed look, then the Level 2 Hostess set, Rustic Rooster is for you! Here's a card I made using this wonderful set:

It's a very basic card layout, but I used many rustic techniques to add to the rustic-ness of the rooster: tearing the bottom edge of the red layer, distressing the edges of several of the layers with the distressing tool from the Cutter Kit (item# 106958) and then sponging the edges to add to the dirty rustic look. To add texture, I also ran the red layer through the Big Shot with the diamond pattern from the Backgrounds 1 Texturz Plates kit (item# 114512). I softly ran the sponge (with Chocolate Chip Ink) over the top and that added shadowing to the edges of the raised embossed areas to create even more dimension. Of course, the "non-precise" watercoloring I did with the Blender Pens (item# 102845) on the rooster was also intentional... to add to his "rustic" look. ;-)
Happy Rustic Stampin!
Brenda

Saturday, February 7, 2009

Valentine's Projects

Here are some of the project we made at my Valentine Sampler Class last week (you'll notice they are all using the Love You Much stamp set and Candy Lane Designer Series Paper):

Other Supplies: White Taffeta Ribbon, Pillow Box Die, Big Shot, Sticky Strip


Other Supplies: Heart to Heart Punch, Dazzling Diamonds Glitter, 2-Way Glue Pen


Other Supplies: Blender Pen, Wide Oval Punch, Scallop Edge Punch, Chocolate Chip Taffeta Ribbon, Clear Rhinestone Brad, Stylus

If you've browsed the Spring-Summer 09 idea book & catalog, this heart shaped box might look familiar. A similar one is featured on page 56. For my version, I substituted a different stamp set and colors, but used the same box design and layout.
*******
When looking for ideas, don't forget that browsing the pages of the IB&C is a great way to find a wealth of creative inspiration and hundreds of project ideas. If you don't have a copy, it's your lucky day! Place an order through my website and you will receive a free copy of the Spring-Summer 09 IB&C... not to mention Sale-A-Bration sets and hostess benefits if your order meets the requirements. There is no minimum purchase requirement to receive your free catalog. This offer is only available while the limited supply of free catalogs last--so be sure to place your order soon!
Happy Stampin!

Another Knit Project...

To make up for the slightly disturbing knit project I posted the other day, I thought I'd share my latest knit project, in all it's furry cuteness splendor:

This is a new pattern for me called Knit Monster Baby Booties. I'm so glad I found it! They took me less than 3 hours to knit up last night while watching tv and I used up scraps from my yarn stash. The pattern says to add french knots to the front for the claws, but I think these are too adorable as they are with the pink fur.

Now, when I find some green furry yarn to make more of these booties, you better believe I'll be adding those claws!

By the way, I made these booties for my former church's crisis pregnancy center. Instead of showing the women who find themselves in an unfortunately situation nasty videos, the kind volunteers at Mary's Haven give them a pair of booties to help them realize that they are carrying a living human being inside of them that will one day (hopefully) be born and fill these booties. This is a very small way for me to give back... you see, I was put up for adoption as a baby. I am so thankful that my birth mom loved me enough to let me be born and gave me a chance at life.

Thursday, February 5, 2009

Hair Knit...

If you've been reading my blog for awhile, you know that I am a knitter, as well as a papercrafter. It's been awhile since I've shared a knit project with you, but I am still knitting. Right now, I'm working on a sock (yes, only one so far), a lace scarf and a hat. Well speaking of hats...

Just after Christmas, I came across a knit project (not my own) that I just HAD to take a picture of and couldn't wait to share with you... seriously, I couldn't wait to blog about it (just ask my husband)! Well, some how life happened, other projects got blogged about, and now over a month later, I am finally getting around to blogging about it.

One of the reasons why I wanted to blog about it is because it reminded me of a project that I shared with you back in September, titled "Creative Hair Craft?". Do you remember that curious piece of handmade wonder??? Click here to refresh your memory. Before seeing that, I had never seen or heard about crafting with human hair.

Well, here's yet another hair handcrafted project:

This hat was on display at Ripley's Believe It or Not! museum in San Antonio. If you click on the picture, you should be able to read the placard that has more details--but, basically, it was knit in 1992 by a barber who collects 2 pounds of hair from his barber shop everyday. As a "committed advocate of hair recycling" and quite the industrious person, he uses the hair to make various things--anywhere from insulation to toys to bikinis! Who knew?! I have to say, he has taken "being green" to a whole new level!

Tuesday, February 3, 2009

Scallop Envelope Party Bowl

If you've ever played Bunco, you know that every table has at least one bowl (if not 2) of sweet and/or salty treats. Creating themed bowls for those candies, nuts or snack mix is a snap now that we have Jackpot Designer Series Paper, the Game Night stamp set... oh, and the Scallop Envelope die for the Big Shot! I can't take credit for coming up with the idea of putting 4 envelopes together to create this cute little box. I first saw it posted by someone on splitcoaststampers.com when Stampin' Up! first started carrying the Big Shot and accessories. Here's my version:

When assembling the box, be sure to include a piece of card stock in the bottom for reinforcement and to cover the gap that's in the bottom so your snacks don't escape. The Game Night stamp set has a dice stamp with 2 die. To get the 3 dice, I inked up just one die and stamped, then I inked up both dice and stamped again. The box is about 3" square and 2" tall.
Happy Stampin!
Brenda

Sunday, February 1, 2009

Let the Sale-A-Bration Begin!

Today marks the start of Stampin' Up!'s much anticipated annual promotion, Sale-A-Bration! If you don't have one in hand, check out the brochure online. There's a link over there ----->.

Here's a card I made using the Sale-A-Bration set called Yummy:

Stamps: Yummy
Card Stock & Ink Colors: Naturals Ivory, Chocolate Chip, Old Olive, So Saffron & Pumpkin Pie
Accessories: Big Shot, Top Note bigz die, Stampin' Up! Flower Burst embosslit die, word window punch & 5/8" grosgrain ribbon

The "a little Something for you" stamp is made to coordinate with the Top Note die. Of course, it would look just as nice on any shaped card front. The flowers are made with the Flower Burst embosslit die. These are new to the Spring-Summer '09 catalog and this is the first project I've made with them. I have to say that I'm in love! It cuts and embosses one of these sweet little flowers all in one roll through the Big Shot. I used a sponge dauber to add some So Saffron & Pumpkin Pie ink to create depth. What do you think? There are 4 other embosslit designs available. Check them out! (pg 202 of the catalog or on the shopping page of my website)

ONLINE ORDERING SPECIAL: Would you like a FREE Spring-Summer 09 catalog? Well, WHILE SUPPLIES LAST, you can get a FREE catalog when you place an order through my website! Don't wait too long, supplies are limited!

Thanks for checking in... I hope you're Happy Stampin!