Monday, December 29, 2008

Retirement Reminder!

With the approach of the new Spring-Summer 09 Catalog release date (Jan 19), I also wanted to remind you that the sets listed on the retiring stamp set list will only be available to order through January 18.

Here are a couple samples using some of my favorite sets:

Retiring Stamp Set: Organic Grace (level 1 hostess set)

It's not too late to schedule an in-home workshop or virtual workshop (via email) so you can earn your favorite hostess set (along with hostess dollars to spend on other items on your wish list) from the Fall-Winter 08 catalog. Just check your calendar and give me a call!


Retiring Stamp Set: Moose You
(Isn't this the cutest set?!)
Be sure to check the retiring stamp set list and place an order for your "must have" sets before it's too late! Either contact me directly to place your order or order online through my website.

Saturday, December 27, 2008

Get Ready for the New Year: Make A Calendar

Here's a calendar I made for my sister:


This was one of those last minute projects that I added to my to-do list and was able to complete in about a 3 hour span of time. I somehow forgot to take a picture of November (hopefully I didn't forget to make November). ;)
I used the Create-a-Calendar kit from the Holiday Mini catalog by trimming the calendar section to a 4" square and using the designer paper side of the leftover pieces to decorate the pages. The pages are 5 1/2 x 8 1/2 (half of a regular piece of cardstock). The pictures are wallet sized prints (2x3). I left some of the pages blank so my sister could add her own pictures.
Once I completed all of the pages and covered a piece of chipboard with cardstock for the base, I used the Crop-A-Dile to punch holes for the binder clips (being sure to line them all up). Because the pages had several layers, I punch the holes on each page separately. For re-enforcement of the holes on the base (chipboard), I attached jumbo eyelets.
You can't see the very top of the calendar, but I created a hole for hanging in the center of the chipboard base. Measuring carefully, I marked a 1/2" line in the center so I could punch a series of smaller holes along the line to create an oblong hole. Then I punched a large hole in the top center, so the calendar would hang straight--just like you find on a lot of hanging packages from a store.
Happy Stampin!
Brenda

Wednesday, December 24, 2008

Merry Christmas... and Valentine's Day too!

I know, I know... it's Christmas Eve and you're probably not thinking about Valentine's Day yet... but it's just around the corner. If you're browsing my blog, you probably have some crafting interest and therefore, Valentine crafting is in the horizon! I just received my Valentine Special "Love You Much" bundle and thought I'd share my first project with you:

The card is about 3x2 (3x4 folded in half) and fits in an envelope made with the SU! exclusive Scallop Envelope Bigz Die. The bundle comes with the Love You Much stamp set, Candy Lane DSP and Heart to Heart punch--all new items from the upcoming Spring-Summer Idea Book & Catalog and only available now by ordering the bundle special for 20% off the regular retail price of $51.85--ON SALE FOR $41.48! Because of the popularity with this bundle, orders must be placed directly with me until Stampin' Up! can get caught up with filling backorders. So, if you're interested in taking advantage of this special, feel free to email or call me.

I hope you and your family have a joyous Christmas and blessed New Year!

Brenda

Thursday, December 18, 2008

Perfectly Pretty Pillow Box Packaging

For those small gifts (candy, chapstick, earrings, necklace, etc.) this little pillow box makes the perfect packaging!

The card stock for the pillow box is cut out using a die in the Big Shot diecut machine--which cuts and scores the card stock perfectly every time. The inside of the box measures about 2" x 2-3/4" with the thickest part being about 1/2". The belly band is just a strip of card stock and designer paper wrapped around the box and secured. I made the flower out of two Ruby Red 5-petal flowers. I also punch a flower out of Kiwi Kiss card stock and cut two of the petals out for leaves. To add dimension, the edges of the flower parts are sponged in the same color as the card stock. The flower center is a half bead from the Pretties Kit.
I can't tell you what's inside of this pretty little box, but I do want to tell you that I cut a 2" x 2-3/4" piece of card stock, punched 1/16" holes evenly spaced to hold the contents and slid it inside... perfectly packaged in this pretty little pillow box! Go ahead, say that 5 times fast... :)
Happy Stampin!

Wednesday, December 17, 2008

Chipboard Picture Frame

I'd like to share another gift I made. This one is for my husband's grandma... Here's what she'll receive in the mail in the next few days:

You may recognize the wrapping paper and ribbon from last year's Holiday Mini... yes, I'm a hoarder. ;) The tag is made using the Fresh Cuts stamp set.

When she opens the package up, here's what she'll find:

Inside I've created a frame for my sons' school pictures:
I think this is a great way to create something extra special out of those little pictures.

The base of the frames are chipboard, layered with cardstock and Urban Garden DSP. The hinges are made using 2 strips of ribbon sandwiched in between the chipboard and outside layers of cardstock/paper. Here's a close-up:

The stamp sets I used are Inspired by Nature and Calendar Alphabets & Numbers.
To get the different colors on the floral image, I used the marker to stamp technique. Since the Baja Breeze color doesn't come in a marker, I use the edge of the ink pad to color the petals of the flowers before I colored the middle of the flowers with a Not Quite Navy marker. To get the textured look, I bounced the markers on the image to create a sort of pool of ink in those spots. Give it a try!
Happy Stampin!

Friday, December 12, 2008

Bag it and Tag it!

Here's a Bag-A-Lope we made at the Packages & Tags class:

What'a "bag-a-lope" you ask? It's a bag that you make out of an envelope by cutting off one end, scoring it on the other 3 sides (on this bag, we scored 3/4" in from each edge) and puffing it out into a bag. Click here for a basic tutorial.
Here's a close up of the tag. We used Little Felt Flurries & Filigree Brads.


And finally, a gift card tag made with Moose You (which is also retiring... sniff, sniff... I just LOVE this set!):

I got the idea for the layout of this card from my blogger friend Tracy.
And here's a close-up of Rudolph's nose:

Tip: to prevent the ends of the brad from catching on the gift card, I taped over them with a piece of scotch tape.


Thanks for looking! And, as always...

Happy Stampin!

Box It...

Like most people, I've been extremely busy preparing for the holidays, on top of regular life stuff. We're getting ready to go out of town for the weekend, but I wanted to share the projects we made at my Packages & Tags classes yesterday.

Here's the first one... a box:

Here's a close up of the tag--notice I used A Tree for all Seasons stamp set which has been around for a long time, but will be retiring at the end of the current catalog sales period.
If you happen to be searching to see this set in the catalog, you won't find it... it's on the dormant list. So to see the set, you'll need to go to the shopping page on my website and look it up.

Tuesday, December 9, 2008

Retiring Stamp Sets Announced and ON SALE FOR 10% off!

Stampin' Up! has just released the list of Retiring Stamp Sets. Check out the links for the list in both alphabetical and numerical order. Although these sets will be available to purchase until the end of the Fall-Winter '08 IB&C sales period (January 18), Stampin' Up! is offering a 10% discount off of these sets now until December 23!

AND, would you believe, they are also offering FREE SHIPPING on all orders of $70 or more through December 23! If you've been holding out on getting anything on your wishlist, now is the time to place your order! Shop now at my Stampin' Up! website!

SPRING-SUMMER 09 CATALOG PREORDER SPECIAL: $10 reserves your copy of the catalog (available to order from starting January 19, 2009), which includes priority shipping to your door as soon as I receive them, $5 coupon off your first order of $50 or more, and a little something extra from me. This offer is only available through me to US residence and will be good until December 31. Email or call me to reserve your copy today!

Happy Stampin!

Saturday, December 6, 2008

Ornament Exchange & Gift Bag

I sure hope my friends at Stitch & Gab aren't reading my blog today. If you are and you don't want to see my ornament for our exchange, stop reading right now! :)
*
*
*
*
*
*
*
*
*
*
*
*
*
I couldn't wait any longer to share the ornament and gift bag I made for our ornament swap that's coming up next week, so here here it is:

Here's a close-up of the tag:

The ornament is knit and felted. I used a pattern for a man's boot sock as a guide for the shaping of the sock--I cut the stitches from the pattern in half and got the perfect size for an ornament.

The gift bag is a Bag-A-Lope, where you tranform an envelope into a bag. If you are interested in learning how to do this technique, I have a class scheduled on Thursday, Dec. 11, called Packages & Tags where this will be one of the techniques I'll be teaching. Contact me to sign up!

Well, I can't promise this will be the last of my holiday gift postings. I've always had a difficult time with surprises... yes, I'll admit, I used to search the house for Santa's stash as a child. I've even been known to blurt out someone else's surprise (sorry, Sis!). It's not that I don't like surprises... I actually LOVE them! I just have a REALLY hard time knowing something really cool is coming and either not knowing everything about it or not sharing it with someone! I will try to keep my gift postings to projects I have made for my loved ones who I don't think check my blog. :)

Happy Stampin!

Tuesday, December 2, 2008

Glittery Butterfly card


Glittery Butterfly card
Originally uploaded by bbstampin
Here's a card I made using one of the sets available for 20% off with the Catalog Sampler Special (see post below). This card is made using the Dreams Du Jour stamp set. The other supplies used are Curly Label Punch Bundle, Urban Garden Designer Series Paper, brads, grosgrain ribbon and COSMO GLITTER!

Catalog Sampler Special: Dec 1 - Jan 18

Now until January 18, you can get 20% off of any of the stamp sets pictured in the Catalog Sampler brochure with a $20 order (click here to see the brochure). Here's a list of the savings!

This offer is available online or with orders placed directly with me. When placing an order online through my website, add all of the regularly priced products to your shopping cart. Once you have entered at least $20 in products, there will be an option on the shopping cart page to add any of the stamp sets from the Sampler brochure with the 20% discount. There's no limit to how many sets you can order with the discount, once you've ordered $20!

Happy Stampin!

Friday, November 28, 2008

Sale Bundles Going Fast!

FYI: The All in the Family and Mission Embossable Bundles are SOLD OUT! If there is a bundle on your wish list, don't wait much longer to place your order! Contact me or go to my website to place your order online today!

Happy Stampin!

Wednesday, November 26, 2008

Glittery Letter Card

Since one of the bundles on sale right now has the sticky cut letters and fine cosmo glitter (Sticky Situation Bundle, item 116222), I thought I'd share a card I made awhile back using them:

The gift stamp is part of a retired set, but we have other birthday stamp sets that would work for a card like this. By the way, this is not the usual card size of half a 8 1/2 x 11 piece of card stock. It is actually 1/4 of a 12x12 piece of card stock--6x6, folded in half to make a 3x6 card. This size card fits in our Small Open-End Envelopes.

If you're interested in ordering the Sticky Situation Bundle or any of the other bundles that are part of the Holiday Extravaganza Sale, go to my website now and shop online!

Happy Stampin!

IT'S HERE! The Sale Starts TODAY!

Check it out!

Go to my Stampin' Up! Website now to place your order! This sale is good through December 1, but supplies are limited!
Happy Stampin!

Monday, November 24, 2008

Holiday Extravaganza Sale Coming Soon! (Nov 26-Dec 1)

I want to give you a heads up about an exciting sale that will begin on November 26. All of the details have not been released yet, but I can tell you that there will be products bundled together and available at a 20-50% discount! This promotion will be available through December 1 (while supplies last)! Be sure to check out my Stampin' Up! website on November 26 to take advantage of these great deals!

Don't forget, online shopping is now available 24/7!

If you'd rather contact me directly to place your order, that's fine too. Just be sure you call me ASAP (my contact info is on my website), as these bundled savings are only while supplies last!

Happy Stampin!

Friday, November 21, 2008

Reverse Masking, with a twist!

Are you looking for simple, single layer card ideas that are also eye catching? Using the reverse masking technique, you can do just that! With the very versatile stamp set Best Wishes & More (page 55, IB&C), I have created 2 cards using that technique, one with a twist. Here's the first one:

Here's how you do it:
  1. Use post-it notes or paper with removable adhesive* to cover (mask) 3/4 - 1" in from each side of a white or neutral card front. Grid paper under your card helps you position the masking just right. You can also use a light pencil mark that can be erased later.
  2. To create depth, use 2 ink pads that are different shades of the same color. (In the top card I used Kiwi Kiss & Old Olive. In the card below, I used Baja Breeze & Not Quite Navy.) Starting with the lighter color, sponge the entire inside exposed area. Then sponge the darker color around the edges of the masking and lightly in random areas in the middle.
  3. While the edges are still masked, ink your stamp with the lighter color and stamp randomly. Then do the same thing with the darker color.
  4. Now remove the masking and add a couple more stamped images in the white space as though they are falling onto and off of your card.
  5. Stamp desired sentiment in the lower right corner.

VOILA! you've made a card out of one piece of card stock! You could add ribbon or other embellishments, but I don't think they need it.

Now for the twist, in the below card I added an extra technique--emboss resist. After I masked the edges, but before I sponged, I used the Versamark pad and clear embossing powder to heat emboss a couple of the snowflakes. The one challenge I found with this step is that the embossing powder wanted to stick to the masking layer. I used a brush to wipe away that extra powder prior to heat setting. Then just continue on with the above steps and you not only have snowflakes in 2 shades of blue, you also have some white ones that POP off the card!
*Since making these cards using post-it notes, I have been thinking about how the masking process could be done more simply (just in case this happens to be your Christmas card and you have to make a bunch of them). I had the idea to cut a piece of printer paper to the size of the card front, use a sliding blade type paper trimmer to cut the inner space out and attach that with removable adhesive. After a few uses, the ink would start to bleed through the paper (just as it would with post-it notes), so you may have to make several of these, but it would definitely make the masking step easier.

I have been working on making our family Christmas cards and have already completed 40 cards. Yesterday I finally went through our friends & family list and counted just how many cards we'll need... and was shocked to discover we'll need OVER 100!!! Up until now, I have been making the multi-layered cards that I designed for last weekend's Christmas card class (which went great, by the way)... I think I may have to switch to the simple single layer card! That is one of the reasons I was motivated to come up with a simpler way of masking. :)

How are your Christmas cards coming along? Have you even started them yet? I hope this inspires you to get working on them. There's just 34 days until Christmas!

Happy Stampin!

Tuesday, November 18, 2008

Decor Elements Monogrammed Journal

I'd like to share a journal I decorated with a monogram from Stampin' Up!'s Decor Elements line:
This is a super quick project. I found the plain black journal on the clearance rack at Borders Book Store. After applying the monogram , I figured it needed a little something else, so I pulled out some satin ribbon and my much hoarded Pretties Kit and add just the right touch to make the cover... well, Pretty! Here's a close-up:
This may not be the most practical embellishment for a book that will be stored on a bookshelf, but I think it would be oh so inspiring to write in at bed time if it were laying on my bedside table. By the way, each letter comes in a pack with an upper and lower case letter, so I have an upper case B leftover to use on another project.
Happy Stampin!

Friday, November 14, 2008

Christmas Card Class Projects

Here are the cards we'll be making tomorrow (Sat) at my Christmas Card class. We'll be making 3 of each--12 cards total (yup, I'm good at math). ;) It's too late to sign up for tomorrow's class, but if you like the cards you see and would like me to schedule another class, please let me know. There's still time!

Also, if you happen to be a friend or family, you will probably be seeing one of these cards up close and personal in less than a month, as these will also be my family's cards this year.

Happy Stampin!

Wednesday, November 12, 2008

Inspiration Journal

I have another project to share with you that was inspired by the Stampin' Up! Regional seminar I went to last month:

A well-known, awesomely creative man in the Stampin' Up! circle, Jaron, shared this idea with us. You start with a coordinating piece of card stock for the base and punch a bunch of various sized circles out of a pack of Designer Series Papers (I used Urban Garden).
Starting in the center, you put a whole circle. From there, you use the circle punches to take bites out of the other circles so they will fit (like a puzzle) around the other pieces. It doesn't have to be exact, but I did find it a bit putsy. Before I glued anything down, I first placed all of the circles. Thank goodness the ceiling fan wasn't on full blast! ;-)
In order to get the circles all the way to the spiral edge, I carefully removed the spiral binding prior to attaching the card stock base. The spiral punch made the binding holes. If you try this, make sure you remember how it goes back on... the first time I put it back together, I put the spiral on upside down.

Jaron uses his book for his inspirational journal. He cuts out pictures from magazines and takes pictures of whatever inspires him, then attaches them to the pages of his journal. He includes notes of whatever colors, accessories, stamps, etc. that he's inspired to use (all Stampin' Up! products, of course). I LOVE THIS IDEA! I'm already inspired wherever I go. I usually use post-it notes or whatever scraps of paper are nearby to sketch my ideas or write my notes on... I love the idea of having one place to keep them all!

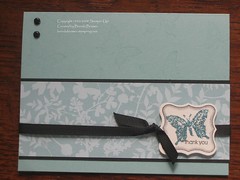
I want to remind of you one of the projects I posted back in August where I showed you my inspiration and the card I made from it:
Aren't the colors a perfect match?!
Now... go find some creative inspiration and get Happy Stampin!

Tuesday, November 11, 2008

Happy Veteran's Day

In honor of Veteran's Day, I want to share my favorite patriotic card:
I used The Free & the Brave and Starstruck stamp sets. The Free & the Brave (item #110982, $19.95) is not in the current catalog, but is on the dormant list--which means you can still order it. I love that set!
.
An embellishment that I used on this card that I always forget about is the Build-A-Brad (the star on the lower left corner). These are so neat because you can add whatever image you want to your cards in a 3-D embellishment using these brads. It comes with the base of the brad, where you attach your image punched out with the 1/2" circle punch (using your desired adhesive--I used Crystal Effects), then you add the clear shiny sticker over the top and attach it to your project as you would a regular brad. Click on the picture for a closer look.
.
If you have any questions about the other products or techniques used on this card, feel free to ask.
.
Happy Stampin!

Monday, November 10, 2008

Rub-Ons On Sale: November 10-30!

In celebration of Stampin’ Up!’s twentieth anniversary, spend $20 in Stampin’ Up! merchandise, and get 20 percent off all Rub-Ons in the Fall-Winter 2008 Idea Book & Catalog (pages 178-179) and Holiday 2008 Mini Catalog (pages 11 & 17)--reg. price $10.95, sale price $8.76!

There are many number of ways to use rub-ons! Here are some ideas:
  • Ceramic canisters
  • Photo frames
  • Appliances
  • Candles
  • Album covers
  • Book covers
  • Photo boxes
  • Keepsakes
  • Invitations
  • Notecards
  • Envelopes
  • Photos
  • Cards
  • Glass doors
  • Windows
  • Mirrors
  • Tile
  • Computers
  • Pencil pouches
  • Lunch sacks
  • Magnets

And many, many more!

Contact me to place your order... or shop online 24/7 at my website. But don’t wait—this offer is only available November 10-November 30!

Happy Stampin!

Friday, November 7, 2008

Pretty in Pink!

Has it really been almost a week since my last post?! Time flies when you're having fun... being creative! I want to share one of the cards I made using a WOW technique I saw at the San Antonio Regional seminar:

Here's a close-up:

As you can see, there are many glittery layers. I will give you the basic directions for creating the flower.
  1. Make each petal by punching small oval out of card stock and then punch large oval directly over the hole created (you'll need 10 petals (pink pirouette) and 2 leaves (certainly celery). I punched them off centered so one edge is a little wider than the other.
  2. Arrange 5 petals on paper vellum in a circle (overlapping middle edges) and adhere (make 2) and then arrange 2 green ovals (overlapping ends) on vellum for leaves and adhere. I used Mono Multi Adhesive very sparingly.
  3. Carefully put liquid adhesive (Mono Multi or Crystal Effects) on flower parts and sprinkle with Dazzling Diamonds Glitter. Tap off excess and let dry.
  4. Cut around the outside of each of the 3 shapes.
  5. Layer the 2 pink flowers as pictured onto card front (use small bit of glue in center between layers to hold in place), poke small hole in center (I used paper piercing tool) and attach Filigree Brad.
  6. Add a bit of glue on end of leaves and tuck under flower as pictured.
  7. Complete card as desired.

Happy Stampin!

Saturday, November 1, 2008

November Class Schedule

Gearing up for the Holiday season, I have scheduled some special gift and Christmas card classes. Check the schedule and if you don't see a class offered that you'd like, let me know. Personal classes are also welcome--get a few of your friends together for some stampin' fun!

FREE EVENT: To Get You Stampin'
Thursday, November 6, 1-3pm
Do you have stamp sets laying around yet to be assembled? Are you stumped for ideas for what to do with your new stampin' supplies? Come over to my house for some guidance and creative inspiration. Bring your stamps, consumable supplies and get stampin'!
Please RSVP by Nov. 5 for this FREE event!

HOLIDAY GIFT CLASS: Tumble Tile Coasters
Thursday, November 13, 10-noon or 7-9pm

Create a set of 4 beautifully hand-stamped tumbled tile coasters--perfect for any gift-giving occasion.
Class fee: $15 (first set of 4 tiles), $10 for each additional set of 4 (Let me know how many you'd like to make when RSVPing)
Please RSVP by Nov 10 **Choose morning or evening class time**
Project Sample of Coasters (many more stamp sets to choose from):


CHRISTMAS CARD CLASS
Saturday, November 15, 1-4pm

Come to this class and make 12 Christmas cards.
Class fee: $20 (includes envelopes)
SUPPLIES YOU NEED TO BRING: scissors & adhesive
RSVP by Nov 10.
**Bring a friend or place an order at this event and get a $5 discount off class fee!**

Don't wait--space is limited! Contact me today to RSVP for any of these events or to schedule your personal event! You are always encouraged to bring a friend to any of my scheduled events. I truly appreciate you helping me grow my business.

Thursday, October 30, 2008

Last Minute Projects with Batty For You!

Since Halloween is TOMORROW, I thought I'd share a couple projects I made TODAY using the Batty for You stamp set. The first one is a huge pumpkin shaped tub that was originally filled with bags of pretzels--you know how I love to recycle & reuse! With a piece of vellum, I traced the shape of the label and then transferred that shape to card stock to create my own label. I used the Well-Worn Alphabet set to spell "treats" and then used the marker to stamp technique to stamp just the bat and spider from the Batty for You set. Doesn't it look YUMMY?!!!!

The second project may look difficult, but it's actually very easy. Click here for the tutorial. I started with a 9" x 4-1/2" piece of card stock.

If you have any questions about either of these projects or anything else I've blogged about, feel free to ask!
I hope you're happy stampin!

A Red Tag to go with the Red Scarf!

The red scarf is finally going to make its way to the Orphan Foundation of America in Virginia, for the Red Scarf Project. I couldn't send the scarf off without attaching a handmade tag with a personal message of encouragement to whoever receives it. Here it is:

The clip is holding a book of postage stamps (one of the suggested things to include for the recipient).

The card is made with the Cute & Curvy stamp set and coordinating Curvy Label punch. I stamped the image in silver ink and embossed it with iridescent ice EP. The image didn't pop like I had hoped, so I stamped over that with classic black ink and zapped it once more with the heat tool to set it. To avoid that extra step (and the risk of not lining the stamp up just right), I might consider stamping the image in black craft ink and embossing it (for future projects).

I'm getting ready to schedule some holiday card and gift classes for November and December. If you have a request for a particular type class or date/time, please let me know.
Happy Stampin!

Saturday, October 25, 2008

Regional Seminar & SCS Dinner Fun!

I went to my first Stampin' Up! event yesterday--the San Antonio Regional Seminar--and had a blast! It started off with general swapping while we waited to check in and receive our make-n-take supplies and stamp set. Here is the swap card I made with the Love Owl-Ways stamp set and Frosty Day DSP from the Holiday Mini:

I only made 15 cards--but I am extremely happy with the 15 cards I swapped for... many neat ideas and great samples from stamp sets that I don't already have that I can display at my stampin' events.

Over the next 7 hours, my friend, Jennifer and new friend, Kathleen and I made 6 awesome make-n-take projects, listened to inspirational demonstrators and received all sorts of creative project ideas and business tips. At the very end I even met Sherri Gardner, the Co-founder and CEO of Stampin' Up!. She is such a sweet lady... so down to earth and real.
(Jennifer, Shelli & Me)
A few hours later, I went to dinner with a bunch of my SCS (splitcoaststampers.com) demo friends. It was so much fun! Meeting everyone in person was such a neat experience.
Here's my long awaited SCS dinner swap card made with the Happiness is a Journey stamp set & Urban Garden DSP (along with many other supplies):

The dry erase board I made for a door prize was a huge hit! The winner, Elizabeth, even did a happy dance. :) I used the Bella Rose DSP, Serif Essential dies with the Big Shot, Flower Fusion Too & rhinestone brads.
If you ever have a chance to attend a Stampin' Up! Regional Seminar (either as a demo or a guest), I would highly suggest it! I can't wait to implement all the wonderful ideas I received in my own creative projects and in my business. Keep an on my schedule of events for upcoming classes.
Happy Stampin!

Thursday, October 23, 2008

Stampin' Up!'s Birthday Party Special!


Don't forget, we are celebrating Stampin' Up!'s 20th year during October with a BIRTHDAY PARTY SPECIAL!!! You have just over one week left to take advantage of this great sale.

Spend $20 in regular catalog merchandise and qualify to purchase any of the birthday/celebration stamp sets listed below at 20 percent off.

109439 Pg 62 Big Bold Birthday $27.95 reg/ $22.36 sale
112895 Pg 62 Cumpleaños genial y divertido (Spanish Big Bold Birthday)* $27.95 reg/ $22.36 sale
111532 Pg 63 Party Hearty* $26.95 reg/ $21.56 sale
110994 Pg 64 Bitty Birthday $12.95 reg/ $10.36 sale
111618 Pg 64 Crazy for Cupcakes* $23.95 reg/ $19.16 sale
111546 Pg 65 Simple Birthday Thanks* $17.95 reg/ $14.36 sale
111702 Pg 65 Time to Party* $16.95 reg/ $13.56 sale
108559 Pg 68 Crab & Company $27.95 reg/ $22.36 sale
*Stamp sets are die cut.

Go to my website and shop online 24/7 or contact me today to place your order! But don't wait too long, this sale ends October 31, 2008!

Happy Stampin!

Wednesday, October 22, 2008

I SAVED THE RED SCARF--by killing it!

With help from my Stitch & Bitch friends, Patty, Teri & Juanita, I fixed the Red Scarf!

When we met last night and I showed them the scarf, they gave me the great news that I hadn't actually melted the scarf after all... I just "killed it"! That's the technical term for: flattened it within an inch of it's life. My knitting friends suggested that I finish the job and kill the rest of the scarf. So I did:

Believe it or not, the flattened scarf has a very nice drape now. Juanita even suggested that it sort of feels like cashmere! Can you believe it, I made a faux cashmere scarf out of cheap acrylic yarn?! The edges still roll a little bit, but not nearly as badly as they did before... I killed it. :)

Well, now that the scarf is done and I'm extremely happy with it, I will be sending it off to The Red Scarf Project. By the way, if you're interested in contributing your own red scarf (or a cash donation) to the cause, you have more time. The deadline has been extended to December 15, 2008. Check out their website for more details.

Monday, October 20, 2008

Red Scarf Finished!

I'm happy to announce that the Red Scarf is done!

From the picture, you may not be able to tell that I actually ruined part of it while steam blocking it. The pattern of the scarf really made the edges roll quite a bit. It rolled so much that it was basically a big tube when I got done knitting it--therefore it HAD to be steam blocked. Well, since I used acrylic yarn, it was important to be very careful during this step or the acrylic would melt... and... well, I guess I wasn't careful enough!

Even from the close-up picture, it's hard to tell, but the left side is totally flat. You can see the the edges on the right side still roll quite a bit. I did block that side too, but I was more careful to not completely melt it flat.

I'm not sure what to do with the scarf now. As it is, I wouldn't feel comfortable giving it away as a gift--let alone donating it to The Red Scarf Project. I will need to enlist some help from my knitting friends to see what they suggest. I may have to go ahead and melt... errr, I mean seriously steam block the right side, just to make the whole thing the same and just hope the kid that receives it doesn't know what it was supposed to look like. sigh...

On the Stampin' front... I have finished my swap cards for the SCS Demo dinner that's on Friday and I have started working on some general swap cards. I also made another dry erase picture frame to give away as a door prize at the dinner--for this one I used Bella Rose DSP, Flower Fusion Too flowers & rhinestone brads. I will post pictures of all of these projects after the big event--probably sometime this weekend.

Friday, October 17, 2008

Nick's Birthday...

Today is my youngest son's 12th birthday! Happy Birthday, Nicholas!

We actually celebrated last night because my husband had to head out of town for his brother's wedding before Nicholas would be getting up today.

Here is the card I made:

Since Stampin' Up! doesn't have any turtle stamps, I had to improvise. I basically tore Old Olive card stock into pieces to create the pattern on the shell. I then adhered them to a piece of Always Artichoke card stock and tore around them to create the shell. Then, I tore more pieces of Old Olive card stock to create the head, feet, tail and eyes. I also inked around the edges of all the pieces to create depth and texture. He's sitting on a piece of Chocolate Chip card stock that I stamped with the Sanded background stamp and inked around the edges to make look like a log. Here's what Nick's "real" turtle, Bartleby's reaction was to the card:

When I posted pictures of the knitted turtle I made for Nick, many of you commented that you couldn't wait to see Nick's reaction when he received him. Well, here it is!

PRICELESS!

By the way, the turtle has been named Pickle... because of his color and how he looks without his shell. :)

I challenge you to be creative today! I'd love to hear about it!

Happy Stampin!

Thursday, October 16, 2008

Altered Journal

Being a mom of 2 boys, I'm always curious what girls these days really wants for a gift. I have 9 nieces between the ages of 16 and 2 and they all live too far away for me to keep up with the things they really like. When it comes time to sending gifts for birthdays or Christmas, I often times take the easy way out and give gift cards for a store I've heard their moms talking about--with a handmade card, of course!

Well, my oldest niece, Emmy, had her 16th birthday yesterday. I can't believe she's really 16! Feeling a bit ambitious, I decided to make her a gift... an altered journal. Although we don't see each other very often, one thing I do know about Emmy is that she's not your "typical" girly girl... so I figured anything pink was out. The Spring Break designer series papers seemed pretty cool, so I went with that. It's retired from our last catalog. What do you think?

As you can see, I also made a coordinating card that will be tucked in the pocket on the inside of the back cover of the journal. (Yes, this is a late gift for Emmy...) Inside the card, there will be "a little something" extra. ;) I hope she likes it!

Aside from the cardstock and designer series papers, I used the Big Shot Diecut Machine, Serif Alphabet "E" die, Pretties kit, eyelets, Frames with a Flourish stamp set, and All Holidays stamp set.

Happy Stampin!