Sunday, October 11, 2009

I'm Back... with my Sept Stamp-A-Stack Projects!

I can't believe it's been so long since I last posted here. It appears life has gotten away with me. I did warn y'all when my husband left on his deployment that things might be a bit crazy here.

Here are the projects we made at my last Stamp-A-Stack.

The first 2 are actually from the same supplies. My customers had the choice to make either or both of these cards. I also added an additional option (not pictured here) of inking the butterfly in Melon Mambo and then sponging it with Rich Razzleberry around the edges to create a 2-toned butterfly.


Stamp Sets: Simple Friendship & Sincere Salutations
Accessories: Razzleberry Lemonade DSP, Wide Oval Punch, Scallop Edge Punch, Piercing Tool, Sponge, Sanding Block, Big Shot & Perfect Details Texturz Plate.

This next card is perfect for Autumn...

Stamp Set: Best Wishes & More

Accessories: Card Stock Vellum, Versamark Ink Pad & Tearing Edge

This last card was a total CASE from a card I found in the Nov/Dec issue of Paper Crafts. While looking for inspiration for card ideas, I came across the card on page 76 and knew it would perfect for this class. Aside from changing out the colors & stamps, I did make a couple other alterations. Instead of attaching a plain rhinestones, I used Stampin' Up!'s rhinestone brads. I also decided to bring all of the colors together in the sentiment by inking each letter separately with markers.


Stamp Sets: All Holidays, Nursery Necessities, Itty Bitty Backgrounds & Circle Circus

Accessories: Rhinestone Brads, 1" Circle Punch, Small Star Punch, 1/16" Handheld Circle Punch, Corner Rounder Punch, In-Color Stampin' Write Marker Set & 8 1/2 x 11 Textured Card Stock

Something I have to point out about all of these cards, I did not use one inch of ribbon! I think that might be a first for me with my classes. Usually at least one, if not all of the cards have ribbon of some sort on them. I don't think any of these cards needed it...

I am hoping to get back into the routine of blogging on a more regular basis. I have a class coming up to make a really cool box out several Pillow Box Die cutouts that I found on Splitcoaststampers. I will be sharing my version of it with you soon!

Happy Stampin!

Monday, September 28, 2009

My Digital Studio Coming Soon!

It's coming October 1!


Click HERE if you can't automatically view video clip.

Host a workshop of at least $400 and get My Digital Studio for 50 percent off the retail price (retail price: $79.95; promotional price: $39.97) when you use your free hostess dollars! On top of that AND the regular hostess benefits, you will also get to choose any item (except for My Digital Studio) in the Holiday Mini for only $10! It's never been a better time to invite your friends and family over for some stampin' fun! Contact me today to learn more or to schedule a workshop between October 1 and November 30.

Happy Stampin!
Brenda

Friday, September 18, 2009

Recycled Spots

I received a beautifully wrapped gift from a friend a couple weeks ago for my birthday. I wish I would have thought to take a picture of it before I ripped it open... but I didn't. The paper and ribbon were so gorgeous that I was inspired to use them to make my friend a thank you note!

I actually had enough of both to make 2 cards. How cool is that?! The stamp is from All Holidays and I used the marker to stamp technique to color the words in different colors. What a simple, yet eye-popping card!


So, if you think you don't have just the right patterned paper for a card, think outside the box and look through your rolls of wrapping paper! All I used for this card was a 3 7/8" square of wrapping paper, layering it with a 4" square of black cardstock, on a 4 1/4" square card. This is also an awesome idea to coordinate your gift card with your wrapped gift. There would be no need to hide your card inside an envelope... just punch a hole in the corner and tie it on with a pretty ribbon!

Scallop Square Punch Tip: In order to get the perfect scallops behind the saying, I punched 4 scallop squares and overlapped them to create just the right size.

Now, I challenge you to make a card using one of those little scraps of wrapping paper that are too pretty to throw away! I'd love to hear/see how your card turns out!

Happy Stampin!

Friday, September 11, 2009

Check Out My New Blog Header!

Check out my new blog header! It's the first from-scratch project using a mix of embellishments, papers, stamps, etc. that I've made with my new My Digital Studio software!

Happy Digital Stampin!

Holiday Mini Open House Make-n-Takes...

In case you missed my Holiday Mini Open House last week, I thought you'd like to see the make-n-take projects we made.

The first one uses the Gobble, Gobble stamp ($6.95/116535) from page 31 of the Mini, along with the Bright Blessings jumbo wheel ($8.50/115626).

My sample doesn't show it, but I also gave the make-n-takers an "advanced" step option to use on their cards. After inking the turkey in Crushed Curry and using a sponge dauber to add Always Artichoke around the edges of the feathers, they could then use another sponge dauber to add some Champagne Mist Shimmer Paint ($5.95/116806) over the entire image... then stamp. This made the turkey sparkle and shine! I will be showing other projects using this new Holiday Mini product in the near future.


We also made this bookmark with the Twick or Tweet stamp set ($18.95/116497) from the mini, along with the Medallion stamp ($17.95/115223):

The word background is one of the papers in the Night & Day Specialty Designer Paper pack ($11.95/116768). Something I didn't realize when I ordered this paper (even though it's listed right in the description in the mini) is that it also includes 2 pieces of black polka dotted window sheets! I'm going to do my best to not hoard these pieces and will hopefully be posting a project or 2 using them soon.
*
A tip I'd like to share with y'all about both of the mini stamp sets I used on these projects... The images all include sayings that are attached. Consider cutting the saying apart from the picture image and mount the words on the side/edge of the stamp. This gives you freedom to stamp just the image or just the saying much more easily. With the Gobble, Gobble stamp, it's like you're getting 2 stamps for the price of one!
*
Happy Stampin!

Wednesday, September 9, 2009

Things I love... (a special card for my hubby)

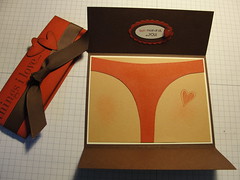
Before sending my hubby's first care package, I decided to make him a very special card. Here's the outside:

It is a tri-fold card with a belly band holding it together--hiding a "cheeky" message inside. Here's a peek (warning: you may want to cover your little one's eyes before scrolling down):
*
*
*
*
*


This panty card was an idea I found several years ago. Stored in the back of my mind, it seemed perfect to include in my hubby's first deployment care package. The Thing I Love stamp set was sort of an after thought to use. I didn't necessarily want to have the derriere out on the front of the card, just in case the package was inspected as it entered the conservative country of Kuwait. Needing something to decorate the outside of the card, that set seemed like a good choice...
*
I had what I think is a clever idea to alter the inside saying... Take a closer look:

I used the marker to stamp technique to first color the "but" in red and added an extra "t". Then I cleaned the stamp and inked the rest of the saying with a brown marker... and stamped. :)
Happy Stampin!

Monday, September 7, 2009

Challenge Successfully Completed!

Wow! Was I on a mission OR WHAT?! Not a bad day when I can stamp guilt-free for over 4 hours straight! What are my kids doing you might ask... well, they are teenagers and are actually happiest when I let them do whatever they want all day long. So my best guess is that their eyes are going buggy while playing on the computer. 8)

Okay, here are my final 2 completed projects. I'd like to share the thought process for the first one. Do you ever look through the Sunday ads or a catalog and see something that just strikes you... whether or not you'd actually wear it. Something about the color combination or the style just calls out to you. Well, when that happens to me, I cut it out and paste it into my inspiration journal. Today, I was actually opening my journal up to write out a list, but the book opened up to this page and it re-inspired me all over again!

So I pulled out the colors that best match (Garden Green, Tempting Turquoise, Gable Green, Chocolate Chip & Bermuda Bay) and came up with this:

Here's a better look:
Stamps: Fifth Avenue Floral, Simple Friendship
Accessories: Cardstock Vellum, Wide Oval Punch, 5/8" grosgrain ribbon, markers, Crop-A-Dile (to punch hole for bow)

What do you think? Yes, it involved a lot of masking (I cut out 2 flowers stamped on a post-it note and just moved them around as I stamped)... and coloring in. This is all done on cardstock vellum and layered over Gable Green cardstock. Pretty neat, huh?!


Here's actually the first card I made today (it may be hard to see, but it's very sparkly):
Stamps: Tree Trimmings, All Holidays
Accessories: Sleigh Bells Ribbon (Mini), Backgrounds 1 Texturz Plate, Big Shot, Horizontal Punch, Wide Oval Punch, Scallop Oval Punch, Iridescent Ice EP, Dimensionals

I used the dryer sheet technique. Ever since I received a swap card at Convention using this technique, I have been wanting to give it a try! In case you were wondering what the heck the dry sheet technique is, I'll share what I did to make this project. First, I stamped the ornaments on a piece of white cardstock and gave it some time to dry. Then I attached a piece of used dryer sheet over my pre-stamped cardstock with a simple glue stick. I sprinkled iridescent ice embossing powder over it and tapped of the excess. Then I carefully heat set it (with a little smoke and laundry fresh smell).
*
Now that I have done my Happy Stampin today, I'm going to go take a break... Thanks for the challenge, Ellie!
Hugs!