
Yikes! I can't believe it's been so long since I posted a project! I guess I've been preoccupied with the excitement of a new catalog coming out in the very near future. If you don't know what I'm talking about, the Spring-Summer 09 Idea Book & Catalog will be released on January 19. Demonstrators who went to the Stampin' Up! Leadership conference (that's going on as I type this) received the first copies on Wednesday and a few demos in Canada received them on Thursday... and, well... I've been glued to their blogs! LOL! I'm hoping my boxes of catties arrive sometime next week... so I can drool over my own!
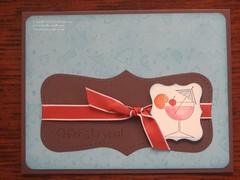
Since we are still in the shadow of New Years Eve and all (hopefully you've recovered from your celebration), I felt sharing a "cheers" card would be in order. This card was made using the Cheers to You stamp set (appropriately named) and the coordinating wheel, Cheers. I also used the Top Note die. If you're wondering "Hey, that doesn't look quite right!", I created a smaller version by cutting off about an inch from each end and sliding those end pieces together. The ribbon covers up the seam.
Anyone interested in coming over for a fruity drink with me?
Happy Stampin!
Friday, January 9, 2009
Monday, January 5, 2009
Retiring Accessories List & Inventory Blowout Sale!
The long awaited Retiring Accessories list has been released! Click HERE to check it out!
And you won't want to miss the Inventory Blowout Sale where you can save upto 50% off of retired, retiring and current products! Click HERE to see the flyer!
WARNING: Once these items are sold out, they are gone! Don't wait to place your order! Either place your order directly through me by emailing or calling me with your order or order online through my website.
Happy Stampin!
Brenda
Thursday, January 1, 2009
Pop-Up Gift Card Holder
Happy New Year, Y'all!
Here's a birthday card I made for my nephew:

Sneak Peek at a new Stamp: A Little Somethin' (Rock Star image) a Level 2 Hostess set
I had seen a gift card holder idea using a typical flat store gift card that was held in the middle of the card--slid inside a flap created by an extra fold. I can't recall the first place I saw the idea, but it has been stored in the back of my mind for awhile. That was my original plan when I decided to get a gift card for my nephew.
Well, once at the store, I found this awesome gift card maze game and couldn't pass it up. I still wanted to use the same card concept, so I had to improvise the design. Here's what I came up with:

Here's a close-up:

The maze is held in firmly with the sticky adhesive that originally attached the gift card to the store card--similar to glue dots.
Stamps: A Little Somethin' (Level 2 Hostess set--new in Spring-Summer 09 Catalog)
Seeing Spots
Celebrate Everything
Calendar Alphabet & Numbers
All Holidays
Ink & Card Stock Colors: Pacific Point, Kiwi Kiss & Naturals White
Accessories: Large Star & Star Punches
My Way Punch
1-1/4" Circle Punch
Crimper
Happy Stampin!
Brenda
Monday, December 29, 2008
Retirement Reminder!
With the approach of the new Spring-Summer 09 Catalog release date (Jan 19), I also wanted to remind you that the sets listed on the retiring stamp set list will only be available to order through January 18.
Here are a couple samples using some of my favorite sets:

Retiring Stamp Set: Organic Grace (level 1 hostess set)
It's not too late to schedule an in-home workshop or virtual workshop (via email) so you can earn your favorite hostess set (along with hostess dollars to spend on other items on your wish list) from the Fall-Winter 08 catalog. Just check your calendar and give me a call!

Retiring Stamp Set: Moose You
(Isn't this the cutest set?!)
Be sure to check the retiring stamp set list and place an order for your "must have" sets before it's too late! Either contact me directly to place your order or order online through my website.
Saturday, December 27, 2008
Get Ready for the New Year: Make A Calendar
Here's a calendar I made for my sister:


This was one of those last minute projects that I added to my to-do list and was able to complete in about a 3 hour span of time. I somehow forgot to take a picture of November (hopefully I didn't forget to make November). ;)


This was one of those last minute projects that I added to my to-do list and was able to complete in about a 3 hour span of time. I somehow forgot to take a picture of November (hopefully I didn't forget to make November). ;)
I used the Create-a-Calendar kit from the Holiday Mini catalog by trimming the calendar section to a 4" square and using the designer paper side of the leftover pieces to decorate the pages. The pages are 5 1/2 x 8 1/2 (half of a regular piece of cardstock). The pictures are wallet sized prints (2x3). I left some of the pages blank so my sister could add her own pictures.
Once I completed all of the pages and covered a piece of chipboard with cardstock for the base, I used the Crop-A-Dile to punch holes for the binder clips (being sure to line them all up). Because the pages had several layers, I punch the holes on each page separately. For re-enforcement of the holes on the base (chipboard), I attached jumbo eyelets.
You can't see the very top of the calendar, but I created a hole for hanging in the center of the chipboard base. Measuring carefully, I marked a 1/2" line in the center so I could punch a series of smaller holes along the line to create an oblong hole. Then I punched a large hole in the top center, so the calendar would hang straight--just like you find on a lot of hanging packages from a store.
Happy Stampin!
Brenda
Wednesday, December 24, 2008
Merry Christmas... and Valentine's Day too!
I know, I know... it's Christmas Eve and you're probably not thinking about Valentine's Day yet... but it's just around the corner. If you're browsing my blog, you probably have some crafting interest and therefore, Valentine crafting is in the horizon! I just received my Valentine Special "Love You Much" bundle and thought I'd share my first project with you:

The card is about 3x2 (3x4 folded in half) and fits in an envelope made with the SU! exclusive Scallop Envelope Bigz Die. The bundle comes with the Love You Much stamp set, Candy Lane DSP and Heart to Heart punch--all new items from the upcoming Spring-Summer Idea Book & Catalog and only available now by ordering the bundle special for 20% off the regular retail price of $51.85--ON SALE FOR $41.48! Because of the popularity with this bundle, orders must be placed directly with me until Stampin' Up! can get caught up with filling backorders. So, if you're interested in taking advantage of this special, feel free to email or call me.
I hope you and your family have a joyous Christmas and blessed New Year!
Brenda
Thursday, December 18, 2008
Perfectly Pretty Pillow Box Packaging
For those small gifts (candy, chapstick, earrings, necklace, etc.) this little pillow box makes the perfect packaging!


The card stock for the pillow box is cut out using a die in the Big Shot diecut machine--which cuts and scores the card stock perfectly every time. The inside of the box measures about 2" x 2-3/4" with the thickest part being about 1/2". The belly band is just a strip of card stock and designer paper wrapped around the box and secured. I made the flower out of two Ruby Red 5-petal flowers. I also punch a flower out of Kiwi Kiss card stock and cut two of the petals out for leaves. To add dimension, the edges of the flower parts are sponged in the same color as the card stock. The flower center is a half bead from the Pretties Kit.
I can't tell you what's inside of this pretty little box, but I do want to tell you that I cut a 2" x 2-3/4" piece of card stock, punched 1/16" holes evenly spaced to hold the contents and slid it inside... perfectly packaged in this pretty little pillow box! Go ahead, say that 5 times fast... :)
Happy Stampin!
Subscribe to:
Posts (Atom)


