Sunday, February 28, 2010

Super Sweet Notecard Set

Need a super sweet gift idea? How about making one of these:

I've posted a similar type box in the past. It's made with two scallop envelope diecuts and two 2-1/4" x 1-1/2" strips of card stock for the sides. The notecards are 3" x 3" (3" x 6" card stock folded in half).

Stamps: Fox & Friends & Tiny Tags (both from the Stampin' Up! Occasions Mini Catalog)
Accessories: Sweet Pea Designer Paper PAD, Corduroy button, Linen Thread, Jewelry Tag Punch, 1/16" Circle Punch, Big Shot, Scallop Envelope Die.
***
If you live in the San Antonio area and would like to get a few of your friends together to make this super sweet gift set, give me a call to schedule your own private class (at your house or mine).
***
Happy Stampin!
Brenda Bromen
210.451.8731

Thursday, February 18, 2010

Baby Boy Blue Knit Hat & Coordinating Card

It's been awhile since I've shared a knitted project with you. So I'll show you a super quick knitted hat that I made for a friend who just had her 7th child. It's a simple 2x2 rib pattern--if you knit, you know what that means. Of course, I couldn't just give her the hat without a coordinating handmade card now could I?!
While I was at it, I thought, Hey! This card is turning out super cute! Why don't I make another one for a sample? So, I DID! I changed the second one up a bit... can you see the differences?

These cards were just as quick and easy to make as the hat. Here's a list of all the punches I used: 1 1/4" & scallop squares, the modern label, word window and scallop edge. I dusted off my Nursery Necessities stamp set to use the cute elephant & saying. There are little dots around the edge of the elephant image--kind of like stitching. After stamping him in Bashful Blue, I used the fine tip on the black stampin' write journaler (marker) to highlight that stitching.

I love the 4 square card layout. It's great for highlighting pretty papers or using up scraps. Here's another version of this layout:
We made this card at my last class. I actually CASE'd it from another demo's card idea, but changed it up by adding the little Jewelry Tag hanging from the ribbon. It's hard to see, but it says {love} on the tag.
If you ever get stumped when sitting down to make a card, consider using this basic layout. If you don't have square or heart punches, consider using flowers, stars or circles...
Happy Stampin!
Brenda

Wednesday, February 3, 2010

Our Hero's Homecoming...

Like I said in my last post, my husband recently came home from a deployment in the middle east. You might not have guessed, but I made a sign for his homecoming! Unfortunately, I didn't get a picture of my son holding it as we were waiting for my hubby to come off the plane. So you'll get to see it as it sits to this day on our mantle instead:

The letters were cut out with my handy Big Shot and the Serif Essentials Alphabet Dies, the stars were punched out using the Large Star punch and the bottom border was stamped with, fittingly, the Hero jumbo wheel.

As we were standing there waiting for the first glimpse of Our Hero, a few other passengers walked by and my son (13 yrs old) was a bit embarrassed to hold up the sign. I encouraged him to hold it up so that his dad would see it as soon as he came around the corner. At that moment, a woman walked by and said "Tell him thanks from me!" As I type this, I'm getting choked up. I have to say that those were common sentiments I heard throughout the entire time my husband was deployed. Even though many of them came from strangers, like the passing lady, I felt the love and appreciation from each and every one of those people. It truly made me proud to be an American and, of course, proud to be married to my wonderful husband!

Happy Stampin!
Brenda

Saturday, January 30, 2010

Catching Up... New Stuff Party Make-N-Takes

Time sure has gotten away from me with my blog posts... I guess I have a good excuse with my husband coming home from his deployment and all. :-) He gets 2 weeks off before he has to go back to work here, so we've been taking advantage of that and going on fun day trips--lunch and margaritas on the Riverwalk, touring caverns and panning for gems, touring the Shiner Brewery... and sampling some new brews, of course! We were lucky enough to be the first of the public to taste their newest beer, Shiner 101. Yumm! This morning, my hubby and I took a drive over to Comfort to visit my favorite Texas yarn shop, The Tinsmith's Wife. We ate lunch at a little bistro around the corner that happens to have the best burger ever and browsed through some of the quaint antique shops.

I explain all of this so that you understand my delay in posting pictures of the make-n-takes we made at my New Stuff Party a couple weeks ago. Here they are:

The Friends card was made with the Vintage Vogue set from the Occasions Mini. The striped paper is from the Sweet Pea Designer Paper Stack. Notice I said STACK, not pack. The Sweet Pea Stack has 48 sheets (2 each of 24 double-sided designs)! This paper is GORGEOUS! The bookmark was made using the Vintage Labels stamp set from the Sale-A-Bration brochure and the Medallion background stamp from the IB&C. Everyone had the chance to try the clear mount stamps. They make it easy to see exactly where you're stamping!

When I finally got around to unpacking from the party a few days later, I noticed I had a some extra supplies from the projects and decided to make them up. Here's how they came out:

The top one is the original card. The middle 2 cards were made with the Fox & Friends set in the Occasions Mini. The vine on the monkey card is from Baroque Motifs. I made the bottom 2 cards using other stamps in the Vintage Vogue set and embellished them with some brads. Here's a closer look:

This brad is from the Silver Hodgepodge Hardware kit. It says Genuine.


The flower was stamp using the rock-n-roll technique, cut out, embellished with a So Saffron Brad and mounted on the card using a dimensional. I added some texture to the backgrounds of all the cards using the texturz plates and my Big Shot.
---
I'm not sure what fun trips we'll be going on this coming week, but I know I will need to sneak some time away in my stamp room so I can start working on the projects for my upcoming All-Occasion card class on February 9. If you're interested in attending the class, we'll be making 6 cards (2 each of 3 designs). The class fee is $10 and all you have to bring is adhesive and scissors. There are 2 times available: 9am-noon and 6:30-9:30pm. Contact me by February 2 to sign up.
---
Happy Stampin!
Brenda

Saturday, January 9, 2010

A Knock Out Snowman!

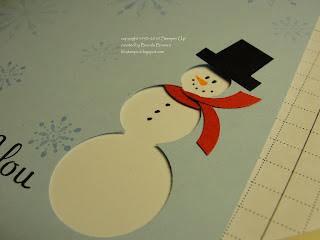
... or I should say a Punched Out Snowman! Check this out... while blog surfing, I found an awesome SUPER SIMPLE wintery card idea on Traci's blog. She actually got the idea from another blogger, Sherri who got the idea from a store-bought card that cost $3.49! Well, actually, I don't think she bought the card, she just borrowed the idea and made one herself! Check them both out here. And now for my spin on it:

Each segment of the snowman is punched out using circle punches--3/4", 1/2" & 1". To create the hat, I used the corner of a 1-1/4" square punch on the edge of a sheet of black cardstock to create a square and rectangle strip to piece together on the front of the card. In case you're a visual learner like me, here's what I'm talking about with the square punch:
I have to say that the card took barely 5 minutes to make... until I got to the scarf part.
I liked Traci's idea of adding a scarf. But rather than drawing it, I decided to use the circle punches to cut narrow pieces to create a scarf that's blowing in the wind. The neck portion is punched first with the 1/2" circle punch. Then, I used the 3/4" circle punch to make a narrow strip. This is then glued on the back side of the card front. The ends of the scarf were punched out using the 1" circle punch and glued to the front of the card.
Here are the individual punched out pieces:
Here's how I got the ends of the scarf:

And a close-up of my Knock Out Snowman!

What a wonderful wintery thank you card! Thanks to Sherri for sharing her original inspiration, and, in turn, to Traci for finding Sherri's project and sharing her version AND again to Traci for commenting on my last blog post which is how I ended up checking out her blog in the first place! Gotta love the world of blogging!

Hope you're staying warm while you're Happy Stampin!

Tuesday, January 5, 2010

Here's one for the Birds!

They're here, THEY'RE HERE! The OCCASIONS MINI CATALOG & SALE-A-BRATION ARE HERE!

I am having a NEW STAMPIN' STUFF PARTY to celebrate!
When: Tuesday, January 12 @ 7pm
Where: My House (in the San Antonio, Texas area)
Contact me to RSVP and to get directions

I hope you can make it! We'll be getting our fingers inky while playing with some of the new clear-mount stamps! There will be class sign-ups, refreshments and DOOR PRIZES!

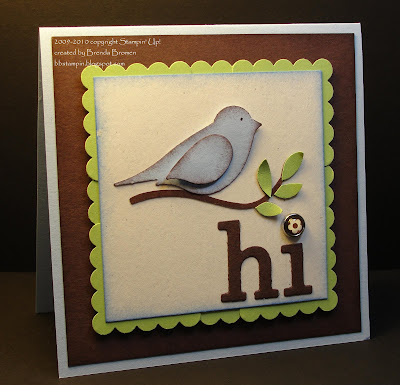
I'll even have some project samples to hopefully inspire you! Here's one you'll see:

This card features one of Stampin' Up!'s new punches... Two-Step Bird (117191/$15.95). I sponged some chocolate chip ink around the edges of the bashful blue bird to give him some depth. I also attached a small piece of a dimensional adhesive behind the tip of the wing and attached the shoulder of the wing with regular adhesive to give him even more dimension!

And here's a close-up:

Check out that epoxy brad! Isn't it too cool! It's new in the Occasions Mini!

To create the scalloped border around the 3" square, I simply pieced together several scallop square punches, overlapping the squares in the middle.


Hope to see you at my party! We'll be Happy Stampin!

Friday, January 1, 2010

Out with the Old, in with the New!

I've mentioned before that the Occasions Mini will be coming soon... January 5, to be exact. You've had a peek here and there of a few of the projects I've made using some of the items I've preordered. Well, if you haven't had a chance to see ALL the exciting new stuff in the NEW Occasions Mini catalog yet, you're in luck! Here it is (click on the picture to open the PDF file):


Another exciting promotion that begins on January 5 is Stampin' Up!'s biggest of the year--SALE-A-BRATION! Here's a peek at that brochure (again, click on the picture):


With the start of the Occasions Mini just around the corner, means the end of the Holiday Mini Catalog. If there are any products in the Holiday Mini that you just can't live without, be sure to place your order by January 4! I also want to point out that the stamps on our DORMANT LIST will no longer be available after January 4. Be sure to check out the list HERE. Either place your order online through the SHOP NOW page on my website or feel free to contact me directly and I can help you place your order.

Hope you're having a Happy Stampin' New Year!