It's coming October 1!
Click HERE if you can't automatically view video clip.
Host a workshop of at least $400 and get My Digital Studio for 50 percent off the retail price (retail price: $79.95; promotional price: $39.97) when you use your free hostess dollars! On top of that AND the regular hostess benefits, you will also get to choose any item (except for My Digital Studio) in the Holiday Mini for only $10! It's never been a better time to invite your friends and family over for some stampin' fun! Contact me today to learn more or to schedule a workshop between October 1 and November 30.
Happy Stampin!
Brenda
Monday, September 28, 2009
Friday, September 18, 2009
Recycled Spots
I received a beautifully wrapped gift from a friend a couple weeks ago for my birthday. I wish I would have thought to take a picture of it before I ripped it open... but I didn't. The paper and ribbon were so gorgeous that I was inspired to use them to make my friend a thank you note!

I actually had enough of both to make 2 cards. How cool is that?! The stamp is from All Holidays and I used the marker to stamp technique to color the words in different colors. What a simple, yet eye-popping card!
So, if you think you don't have just the right patterned paper for a card, think outside the box and look through your rolls of wrapping paper! All I used for this card was a 3 7/8" square of wrapping paper, layering it with a 4" square of black cardstock, on a 4 1/4" square card. This is also an awesome idea to coordinate your gift card with your wrapped gift. There would be no need to hide your card inside an envelope... just punch a hole in the corner and tie it on with a pretty ribbon!
Scallop Square Punch Tip: In order to get the perfect scallops behind the saying, I punched 4 scallop squares and overlapped them to create just the right size.
Now, I challenge you to make a card using one of those little scraps of wrapping paper that are too pretty to throw away! I'd love to hear/see how your card turns out!
Happy Stampin!
Friday, September 11, 2009
Check Out My New Blog Header!
Check out my new blog header! It's the first from-scratch project using a mix of embellishments, papers, stamps, etc. that I've made with my new My Digital Studio software!


Happy Digital Stampin!
Holiday Mini Open House Make-n-Takes...
In case you missed my Holiday Mini Open House last week, I thought you'd like to see the make-n-take projects we made.
The first one uses the Gobble, Gobble stamp ($6.95/116535) from page 31 of the Mini, along with the Bright Blessings jumbo wheel ($8.50/115626).

My sample doesn't show it, but I also gave the make-n-takers an "advanced" step option to use on their cards. After inking the turkey in Crushed Curry and using a sponge dauber to add Always Artichoke around the edges of the feathers, they could then use another sponge dauber to add some Champagne Mist Shimmer Paint ($5.95/116806) over the entire image... then stamp. This made the turkey sparkle and shine! I will be showing other projects using this new Holiday Mini product in the near future.
We also made this bookmark with the Twick or Tweet stamp set ($18.95/116497) from the mini, along with the Medallion stamp ($17.95/115223):

The word background is one of the papers in the Night & Day Specialty Designer Paper pack ($11.95/116768). Something I didn't realize when I ordered this paper (even though it's listed right in the description in the mini) is that it also includes 2 pieces of black polka dotted window sheets! I'm going to do my best to not hoard these pieces and will hopefully be posting a project or 2 using them soon.
*
A tip I'd like to share with y'all about both of the mini stamp sets I used on these projects... The images all include sayings that are attached. Consider cutting the saying apart from the picture image and mount the words on the side/edge of the stamp. This gives you freedom to stamp just the image or just the saying much more easily. With the Gobble, Gobble stamp, it's like you're getting 2 stamps for the price of one!
*
Happy Stampin!
Wednesday, September 9, 2009
Things I love... (a special card for my hubby)
Before sending my hubby's first care package, I decided to make him a very special card. Here's the outside:


I used the marker to stamp technique to first color the "but" in red and added an extra "t". Then I cleaned the stamp and inked the rest of the saying with a brown marker... and stamped. :)

It is a tri-fold card with a belly band holding it together--hiding a "cheeky" message inside. Here's a peek (warning: you may want to cover your little one's eyes before scrolling down):
*
*
*
*
*
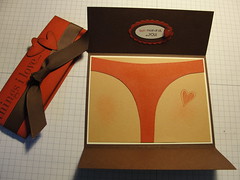
This panty card was an idea I found several years ago. Stored in the back of my mind, it seemed perfect to include in my hubby's first deployment care package. The Thing I Love stamp set was sort of an after thought to use. I didn't necessarily want to have the derriere out on the front of the card, just in case the package was inspected as it entered the conservative country of Kuwait. Needing something to decorate the outside of the card, that set seemed like a good choice...
*
I had what I think is a clever idea to alter the inside saying... Take a closer look:

I used the marker to stamp technique to first color the "but" in red and added an extra "t". Then I cleaned the stamp and inked the rest of the saying with a brown marker... and stamped. :)
Happy Stampin!
Monday, September 7, 2009
Challenge Successfully Completed!
Wow! Was I on a mission OR WHAT?! Not a bad day when I can stamp guilt-free for over 4 hours straight! What are my kids doing you might ask... well, they are teenagers and are actually happiest when I let them do whatever they want all day long. So my best guess is that their eyes are going buggy while playing on the computer. 8)
Okay, here are my final 2 completed projects. I'd like to share the thought process for the first one. Do you ever look through the Sunday ads or a catalog and see something that just strikes you... whether or not you'd actually wear it. Something about the color combination or the style just calls out to you. Well, when that happens to me, I cut it out and paste it into my inspiration journal. Today, I was actually opening my journal up to write out a list, but the book opened up to this page and it re-inspired me all over again!

So I pulled out the colors that best match (Garden Green, Tempting Turquoise, Gable Green, Chocolate Chip & Bermuda Bay) and came up with this:

Here's a better look:

What do you think? Yes, it involved a lot of masking (I cut out 2 flowers stamped on a post-it note and just moved them around as I stamped)... and coloring in. This is all done on cardstock vellum and layered over Gable Green cardstock. Pretty neat, huh?!
Here's actually the first card I made today (it may be hard to see, but it's very sparkly):
Okay, here are my final 2 completed projects. I'd like to share the thought process for the first one. Do you ever look through the Sunday ads or a catalog and see something that just strikes you... whether or not you'd actually wear it. Something about the color combination or the style just calls out to you. Well, when that happens to me, I cut it out and paste it into my inspiration journal. Today, I was actually opening my journal up to write out a list, but the book opened up to this page and it re-inspired me all over again!

So I pulled out the colors that best match (Garden Green, Tempting Turquoise, Gable Green, Chocolate Chip & Bermuda Bay) and came up with this:

Here's a better look:

Stamps: Fifth Avenue Floral, Simple Friendship
Accessories: Cardstock Vellum, Wide Oval Punch, 5/8" grosgrain ribbon, markers, Crop-A-Dile (to punch hole for bow)
What do you think? Yes, it involved a lot of masking (I cut out 2 flowers stamped on a post-it note and just moved them around as I stamped)... and coloring in. This is all done on cardstock vellum and layered over Gable Green cardstock. Pretty neat, huh?!
Here's actually the first card I made today (it may be hard to see, but it's very sparkly):

Stamps: Tree Trimmings, All Holidays
Accessories: Sleigh Bells Ribbon (Mini), Backgrounds 1 Texturz Plate, Big Shot, Horizontal Punch, Wide Oval Punch, Scallop Oval Punch, Iridescent Ice EP, Dimensionals
I used the dryer sheet technique. Ever since I received a swap card at Convention using this technique, I have been wanting to give it a try! In case you were wondering what the heck the dry sheet technique is, I'll share what I did to make this project. First, I stamped the ornaments on a piece of white cardstock and gave it some time to dry. Then I attached a piece of used dryer sheet over my pre-stamped cardstock with a simple glue stick. I sprinkled iridescent ice embossing powder over it and tapped of the excess. Then I carefully heat set it (with a little smoke and laundry fresh smell).
*
Now that I have done my Happy Stampin today, I'm going to go take a break... Thanks for the challenge, Ellie!
Hugs!
My Birthday Challenge!
My sweet friend, Ellie, has challenged me to join her in her challenge to make 3 cards today. Being that it's my birthday and I should "get" to do something fun for myself today... I accepted her challenge and, therefore, feel obligated to HAVE TO STAMP TODAY! How cool is that?! I will share one of the projects I have already completed... it's actually the 2nd one so far today. I will post the other one a bit later.
Inside:

Close-up:


Inside:

Close-up:

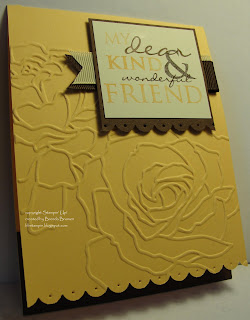
Stamps: Fifth Avenue Floral, All Holidays
Accessories: 5/8" Grosgrain Ribbon, Scallop Edge Punch, Piercing Tool, Apricot Appeal & Chocolate Chip markers, Manhattan Flower Textured Impressions Die, Big Shot, Dimensionals
*
I actually made 2 of these cards with the plans to use them as thank you cards for my thoughtful friends who have been extra-special to me lately. Hopefully they aren't reading my blog today. :)
*
Hope you're having a Happy Stampin' day too!
Brenda
Sunday, September 6, 2009
My Other Convention Swaps
Here are the last of the swaps I made for Convention. These cards were for the Sizzix (Big Shot) Swap.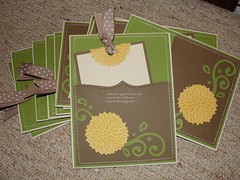
Can you name all the dies I used? There are 3...
1. Flower Burst Embosslit Die
2. Swirls Scribbles Sizzlits Die
and... drum roll, please....
3. Top Note Bigz Die!
The swirls were a little putsy to glue on, but I only had to make 11 of these cards. I planned ahead and had all the parts cut out before the movers started packing up our house--so I could work on them in the middle of our move!
There are a couple other things I'd like to point out. I cut the cardstock for the pocket to just the right size before running it through the Big Shot with the Top Note Die. I centered the cardstock and placed it over only one cutting edge of the die, so the other edges were not cut and remained straight. You can't see it (inside the pocket), but I did the same thing with the bottom of the white layer on the tag. You may have figured this out, but a Flower Burst is folded over the top of the tag.
Before I actually started to assemble them all, I struggled with the decision about whether or not to sew on the cards. Being a Stampin' Up! demo swap, the rules were to use only current Stampin' Up! products. I tried attaching the pocket with adhesive and then using a white gel pen to draw faux stitches, but I just didn't like the look. So I went ahead and ran them through my sewing machine. Had I not cut all the parts out before realizing this might be an issue, I would have cut the pockets wider and folded them around the back of the Old Olive layer and maybe left the stitching off... or maybe not. I really think the stitching adds a lot to the card. What do you think?
Happy Stampin!
Friday, September 4, 2009
Long overdue... My Convention Swaps!
I've been meaning to post these for quite some time now. They were hidden in my blog pix folder. These are the cards I made for a couple of the organized swaps I signed up for at Convention. The first one was for a 3x3 card swap:
.JPG)
Stamps: Bright Blessing Jumbo Wheel & Fundamental Phrases
Accessories: Leaves #2 Die, Modern Label Punch, Brad, Sponge, tissue paper
Here's how I got the texture on the leaves: First, I used a glue stick to attach crumpled white tissue paper onto a piece of So Saffron cardstock. Then I ran it through the Big Shot with the Leaves #2 die. After that, I sponged More Mustard classic ink all over the leaves... and there you have it! Faux Silk Leaves!
Here's the card I made for the Splitcoaststampers Dinner Swap:
.JPG)
Stamps: Circle Circus & Teeny Tiny Wishes
Accessories: Backgrounds 1 Texturz Plate, Modern Label Punch, 1 3/8" Circle Punch, Sanding Block, Embossing Powder (Silver & Iridescent Ice), Brad, Perfect Plum Craft Ink
The WOW factor on this card (although it's hard to see online), is the sparkly circle. It's simple, really. I stamped the circle in Perfect Plum CRAFT ink on white cardstock and then heat embossed it with Iridescent Ice embossing powder. I LOVE THAT STUFF! To add even more dimension, I added a brad in the center of one of the flowers. It's punched out using a circle punch and attached to the black cardstock.
The background is another neat, but super simple technique. First you run the cardstock through the Big Shot with the Background 1 Texturz Plate (elegant swirls) and then you use a sanding block to lightly sand the raised areas to make the swirls POP! How cool is that?!
Well, I hope you're getting your creative groove on over this long holiday weekend. I just received my demo pre-ordered copy of the My Digital Studio software (in the Holiday Mini) and have been playing around with it. I can't wait to share some of the projects I create using it. In case you were wondering, the software will be available for customers to order beginning on October 1! If you'd like to purchase the software for 1/2 price, consider hosting a workshop! If the sales are $400 or more, you'll get your very own My Digital Studio for just that! Contact me today to find out more information or to schedule your workshop!
Happy Stampin!
Brenda
.JPG)
Stamps: Bright Blessing Jumbo Wheel & Fundamental Phrases
Accessories: Leaves #2 Die, Modern Label Punch, Brad, Sponge, tissue paper
Here's how I got the texture on the leaves: First, I used a glue stick to attach crumpled white tissue paper onto a piece of So Saffron cardstock. Then I ran it through the Big Shot with the Leaves #2 die. After that, I sponged More Mustard classic ink all over the leaves... and there you have it! Faux Silk Leaves!
Here's the card I made for the Splitcoaststampers Dinner Swap:
.JPG)
Stamps: Circle Circus & Teeny Tiny Wishes
Accessories: Backgrounds 1 Texturz Plate, Modern Label Punch, 1 3/8" Circle Punch, Sanding Block, Embossing Powder (Silver & Iridescent Ice), Brad, Perfect Plum Craft Ink
The WOW factor on this card (although it's hard to see online), is the sparkly circle. It's simple, really. I stamped the circle in Perfect Plum CRAFT ink on white cardstock and then heat embossed it with Iridescent Ice embossing powder. I LOVE THAT STUFF! To add even more dimension, I added a brad in the center of one of the flowers. It's punched out using a circle punch and attached to the black cardstock.
The background is another neat, but super simple technique. First you run the cardstock through the Big Shot with the Background 1 Texturz Plate (elegant swirls) and then you use a sanding block to lightly sand the raised areas to make the swirls POP! How cool is that?!
Well, I hope you're getting your creative groove on over this long holiday weekend. I just received my demo pre-ordered copy of the My Digital Studio software (in the Holiday Mini) and have been playing around with it. I can't wait to share some of the projects I create using it. In case you were wondering, the software will be available for customers to order beginning on October 1! If you'd like to purchase the software for 1/2 price, consider hosting a workshop! If the sales are $400 or more, you'll get your very own My Digital Studio for just that! Contact me today to find out more information or to schedule your workshop!
Happy Stampin!
Brenda
Subscribe to:
Posts (Atom)