Monday, September 7, 2009

My Birthday Challenge!

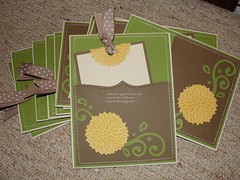
My sweet friend, Ellie, has challenged me to join her in her challenge to make 3 cards today. Being that it's my birthday and I should "get" to do something fun for myself today... I accepted her challenge and, therefore, feel obligated to HAVE TO STAMP TODAY! How cool is that?! I will share one of the projects I have already completed... it's actually the 2nd one so far today. I will post the other one a bit later.

Inside:

Close-up:
Stamps: Fifth Avenue Floral, All Holidays
Accessories: 5/8" Grosgrain Ribbon, Scallop Edge Punch, Piercing Tool, Apricot Appeal & Chocolate Chip markers, Manhattan Flower Textured Impressions Die, Big Shot, Dimensionals
*
I actually made 2 of these cards with the plans to use them as thank you cards for my thoughtful friends who have been extra-special to me lately. Hopefully they aren't reading my blog today. :)
*
Hope you're having a Happy Stampin' day too!
Brenda

Sunday, September 6, 2009

My Other Convention Swaps


Here are the last of the swaps I made for Convention. These cards were for the Sizzix (Big Shot) Swap.

Can you name all the dies I used? There are 3...


1. Flower Burst Embosslit Die
2. Swirls Scribbles Sizzlits Die

and... drum roll, please....

3. Top Note Bigz Die!

The swirls were a little putsy to glue on, but I only had to make 11 of these cards. I planned ahead and had all the parts cut out before the movers started packing up our house--so I could work on them in the middle of our move!

There are a couple other things I'd like to point out. I cut the cardstock for the pocket to just the right size before running it through the Big Shot with the Top Note Die. I centered the cardstock and placed it over only one cutting edge of the die, so the other edges were not cut and remained straight. You can't see it (inside the pocket), but I did the same thing with the bottom of the white layer on the tag. You may have figured this out, but a Flower Burst is folded over the top of the tag.

Before I actually started to assemble them all, I struggled with the decision about whether or not to sew on the cards. Being a Stampin' Up! demo swap, the rules were to use only current Stampin' Up! products. I tried attaching the pocket with adhesive and then using a white gel pen to draw faux stitches, but I just didn't like the look. So I went ahead and ran them through my sewing machine. Had I not cut all the parts out before realizing this might be an issue, I would have cut the pockets wider and folded them around the back of the Old Olive layer and maybe left the stitching off... or maybe not. I really think the stitching adds a lot to the card. What do you think?

Happy Stampin!

Friday, September 4, 2009

Long overdue... My Convention Swaps!

I've been meaning to post these for quite some time now. They were hidden in my blog pix folder. These are the cards I made for a couple of the organized swaps I signed up for at Convention. The first one was for a 3x3 card swap:

Stamps: Bright Blessing Jumbo Wheel & Fundamental Phrases
Accessories: Leaves #2 Die, Modern Label Punch, Brad, Sponge, tissue paper


Here's how I got the texture on the leaves: First, I used a glue stick to attach crumpled white tissue paper onto a piece of So Saffron cardstock. Then I ran it through the Big Shot with the Leaves #2 die. After that, I sponged More Mustard classic ink all over the leaves... and there you have it! Faux Silk Leaves!


Here's the card I made for the Splitcoaststampers Dinner Swap:

Stamps: Circle Circus & Teeny Tiny Wishes
Accessories: Backgrounds 1 Texturz Plate, Modern Label Punch, 1 3/8" Circle Punch, Sanding Block, Embossing Powder (Silver & Iridescent Ice), Brad, Perfect Plum Craft Ink


The WOW factor on this card (although it's hard to see online), is the sparkly circle. It's simple, really. I stamped the circle in Perfect Plum CRAFT ink on white cardstock and then heat embossed it with Iridescent Ice embossing powder. I LOVE THAT STUFF! To add even more dimension, I added a brad in the center of one of the flowers. It's punched out using a circle punch and attached to the black cardstock.


The background is another neat, but super simple technique. First you run the cardstock through the Big Shot with the Background 1 Texturz Plate (elegant swirls) and then you use a sanding block to lightly sand the raised areas to make the swirls POP! How cool is that?!


Well, I hope you're getting your creative groove on over this long holiday weekend. I just received my demo pre-ordered copy of the My Digital Studio software (in the Holiday Mini) and have been playing around with it. I can't wait to share some of the projects I create using it. In case you were wondering, the software will be available for customers to order beginning on October 1! If you'd like to purchase the software for 1/2 price, consider hosting a workshop! If the sales are $400 or more, you'll get your very own My Digital Studio for just that! Contact me today to find out more information or to schedule your workshop!


Happy Stampin!
Brenda

Wednesday, August 26, 2009

I'm On A Decor Elements Kick!

Okay, I have to share a project I just did while hanging some things in our new house.

As you may know, my hubby is deployed. I decided to hang 2 clocks so the boys and I can keep track of what time it is in Kuwait... and here, of course.

Well, I've had this roll of Chocolate Decor Elements sheets (114337) for quite some time now and have, for some reason, been afraid to use it. I think it's my hoarding complex kicking in. Whatever it was, I got over it. For those of you who may not understand what hoarding is all about, I'll explain how it works for me. I buy things because I think they're cute or a great idea or I JUST HAVE TO HAVE THEM. These things may or may not cost all that much, but they are very "rare" and "valuable" things to me, so they can only be used on a VERY SPECIAL project... if they ever get used at all. I figured this was a "Decor Elements sheet worthy" idea, so I finally cut into it! I have to tell you, this project took me all of 30 minutes. The most challenging part was lining up the letters, which wasn't too difficult (just don't look too closely).

The letters are cut out with the Big Shot (113439) and the Serif Essentials Alphabet (113464). Here's a look at the clocks where they hang over our desk and the elderly desktop computer that I try not to use much anymore since getting my laptop.


Now that I've cut into these sheets and find that it's actually kind of fun (and maybe even a bit liberating), I'm wondering what else I can label!

STARTER KIT SPECIAL REMINDER: While we're on the subject of time, don't forget that time is running out to take advantage of the awesome $85 starter kit special! It ends in less than a week on August 31. If you've ever thought about becoming a Stampin' Up! demo, now is perfect the time to take the plunge! Even if you're not interested in "selling stuff", you don't have to! Just think, you can hoard even more with your very own 20% demo discount! Not that I condone hoarding... I'm just saying... If you'd like more information or are interested in signing up, give me a call or send me an email. My contact info is on my website.

Happy Stampin & Decor Elements Applyin!
Monday, August 24, 2009

Blogging on my New Computer!

Today is a bittersweet day for me. My kids went back to school, which should have me doing back flips of excitement. However, at the wee hours of the morning, I had to bring my hubby to the airport for his deployment to the middle east. He will only be gone for about 4 months, but during those 4 months we will be celebrating several holidays and a couple birthdays--including mine (Sept 7). Since he was taking his laptop with him and our desktop computer has become so sluggish in its old age, I got my birthday present, my very own laptop computer, a little early! I've had it for about a week now and spent yesterday transferring all of my files from my hubby's computer to my own. AND... I made it look pretty with some So Saffron Upsy Daisies Decor Elements ($9.95/117926):

These were super easy to apply. All I did was trim them down a little bit, gently rub them with my finger and peel back the backing paper.

To make it through the day, I think I'll head to my craft room to create some new Holiday Mini samples for my upcoming Holiday Mini Open House on September 3... it's called Stamp Therapy!

Happy Stampin!

Friday, August 21, 2009

Best Time To Become A Demo... ENDS AUGUST 31!

Have you ever thought about doing what I do... being a Stampin' Up! Demo? With the $85 mini starter kit special, now would be the perfect time to give it a try. Here's what you'll get:

Whether you want the opportunity to receive the demo discount (20%) on all your orders or you'd like to earn some extra money, this is an awesome deal! For more information, check out the details HERE. If you're ready to sign up, it's easy! Go to the Start Your Own Business page on my website and click on JOIN NOW. You'll need this password: bbstampinrecruit
If you have any questions or would like to talk about this wonderful opportunity, feel free to give me a call! 210-557-1455.
Happy Stampin!

Thursday, August 20, 2009

Convention Continued: Turtle Montage

Having a son who has LOVED turtles for over 7 years (he's 12 now), I am always on the lookout for turtles wherever I go. My trip to Utah was no different. How excited do you think I was to see that the "demo flight" (yes, the plane was filled with mostly demos on their way to convention) from Denver to Salt Lake City on Wednesday (Aug 5) had Sheldon the sea turtle on the tail?! This was the first picture I took on my trip... and I HAD to call home to tell my son about it. His reaction... cool.


Later that same day, during our tour of Demo Support at the Riverton campus, I saw this:

I forgot to note which DS agent's cubical this was... whoever she is, she's cool in my book! BTW, isn't that butterfly basket of flowers cool too?! That entire thing was made using our awesome Big Shot with Beautiful Butterflies ($21.95, 114507) & Daisies #2 ($19.95, 114520)!

Then, on the last day, someone asked if I had seen the pop-up ball turtle on display... um, NO! Why had she not mentioned that earlier... I do not know! So, as soon as I was done with my lunch, I was off in search of the turtle! Here it is!

And a side view:

I don't have this Pop-Up 3D Ball die ($39.95, 116759), so I don't exactly understand the engineering behind how it works, but isn't this turtle COOL!
AND, then I walked around the displays some more and found this:

It's our Decor Elements T is for Turtle in Old Olive ($4.95, 117908) and "Is For" in black ($1.95, 117529).

Happy Stampin!